The 8 April 2024 Total Solar Eclipse Experience: Part 2

This is the second blog post about the April 8th 2024 total solar eclipse that was witnessed by hundreds at Royal Botanical Gardens (Canada) in Hamilton, Ontario. I had the privilege of being the interpretive lead for the event, and was able to provide my own telescope for people to view the partial phases of the eclipse in safety. A previous blog post described the preparations for the event.

Monday 8th April started out as an inauspicious looking day. The weather forecast was largely for cloud in the Hamilton area, and everyone was feeling a little pessimistic as to whether we would see anything other than a great big shadow in the afternoon. I arrived at the RBG Arboretum around 11:00 AM to start setting up my telescope and to get a feeling for the space in which the audience would experience the event.

One of the wonderful RBG volunteers taking a turn looking at the partial solar eclipse through the 5″ telescope.

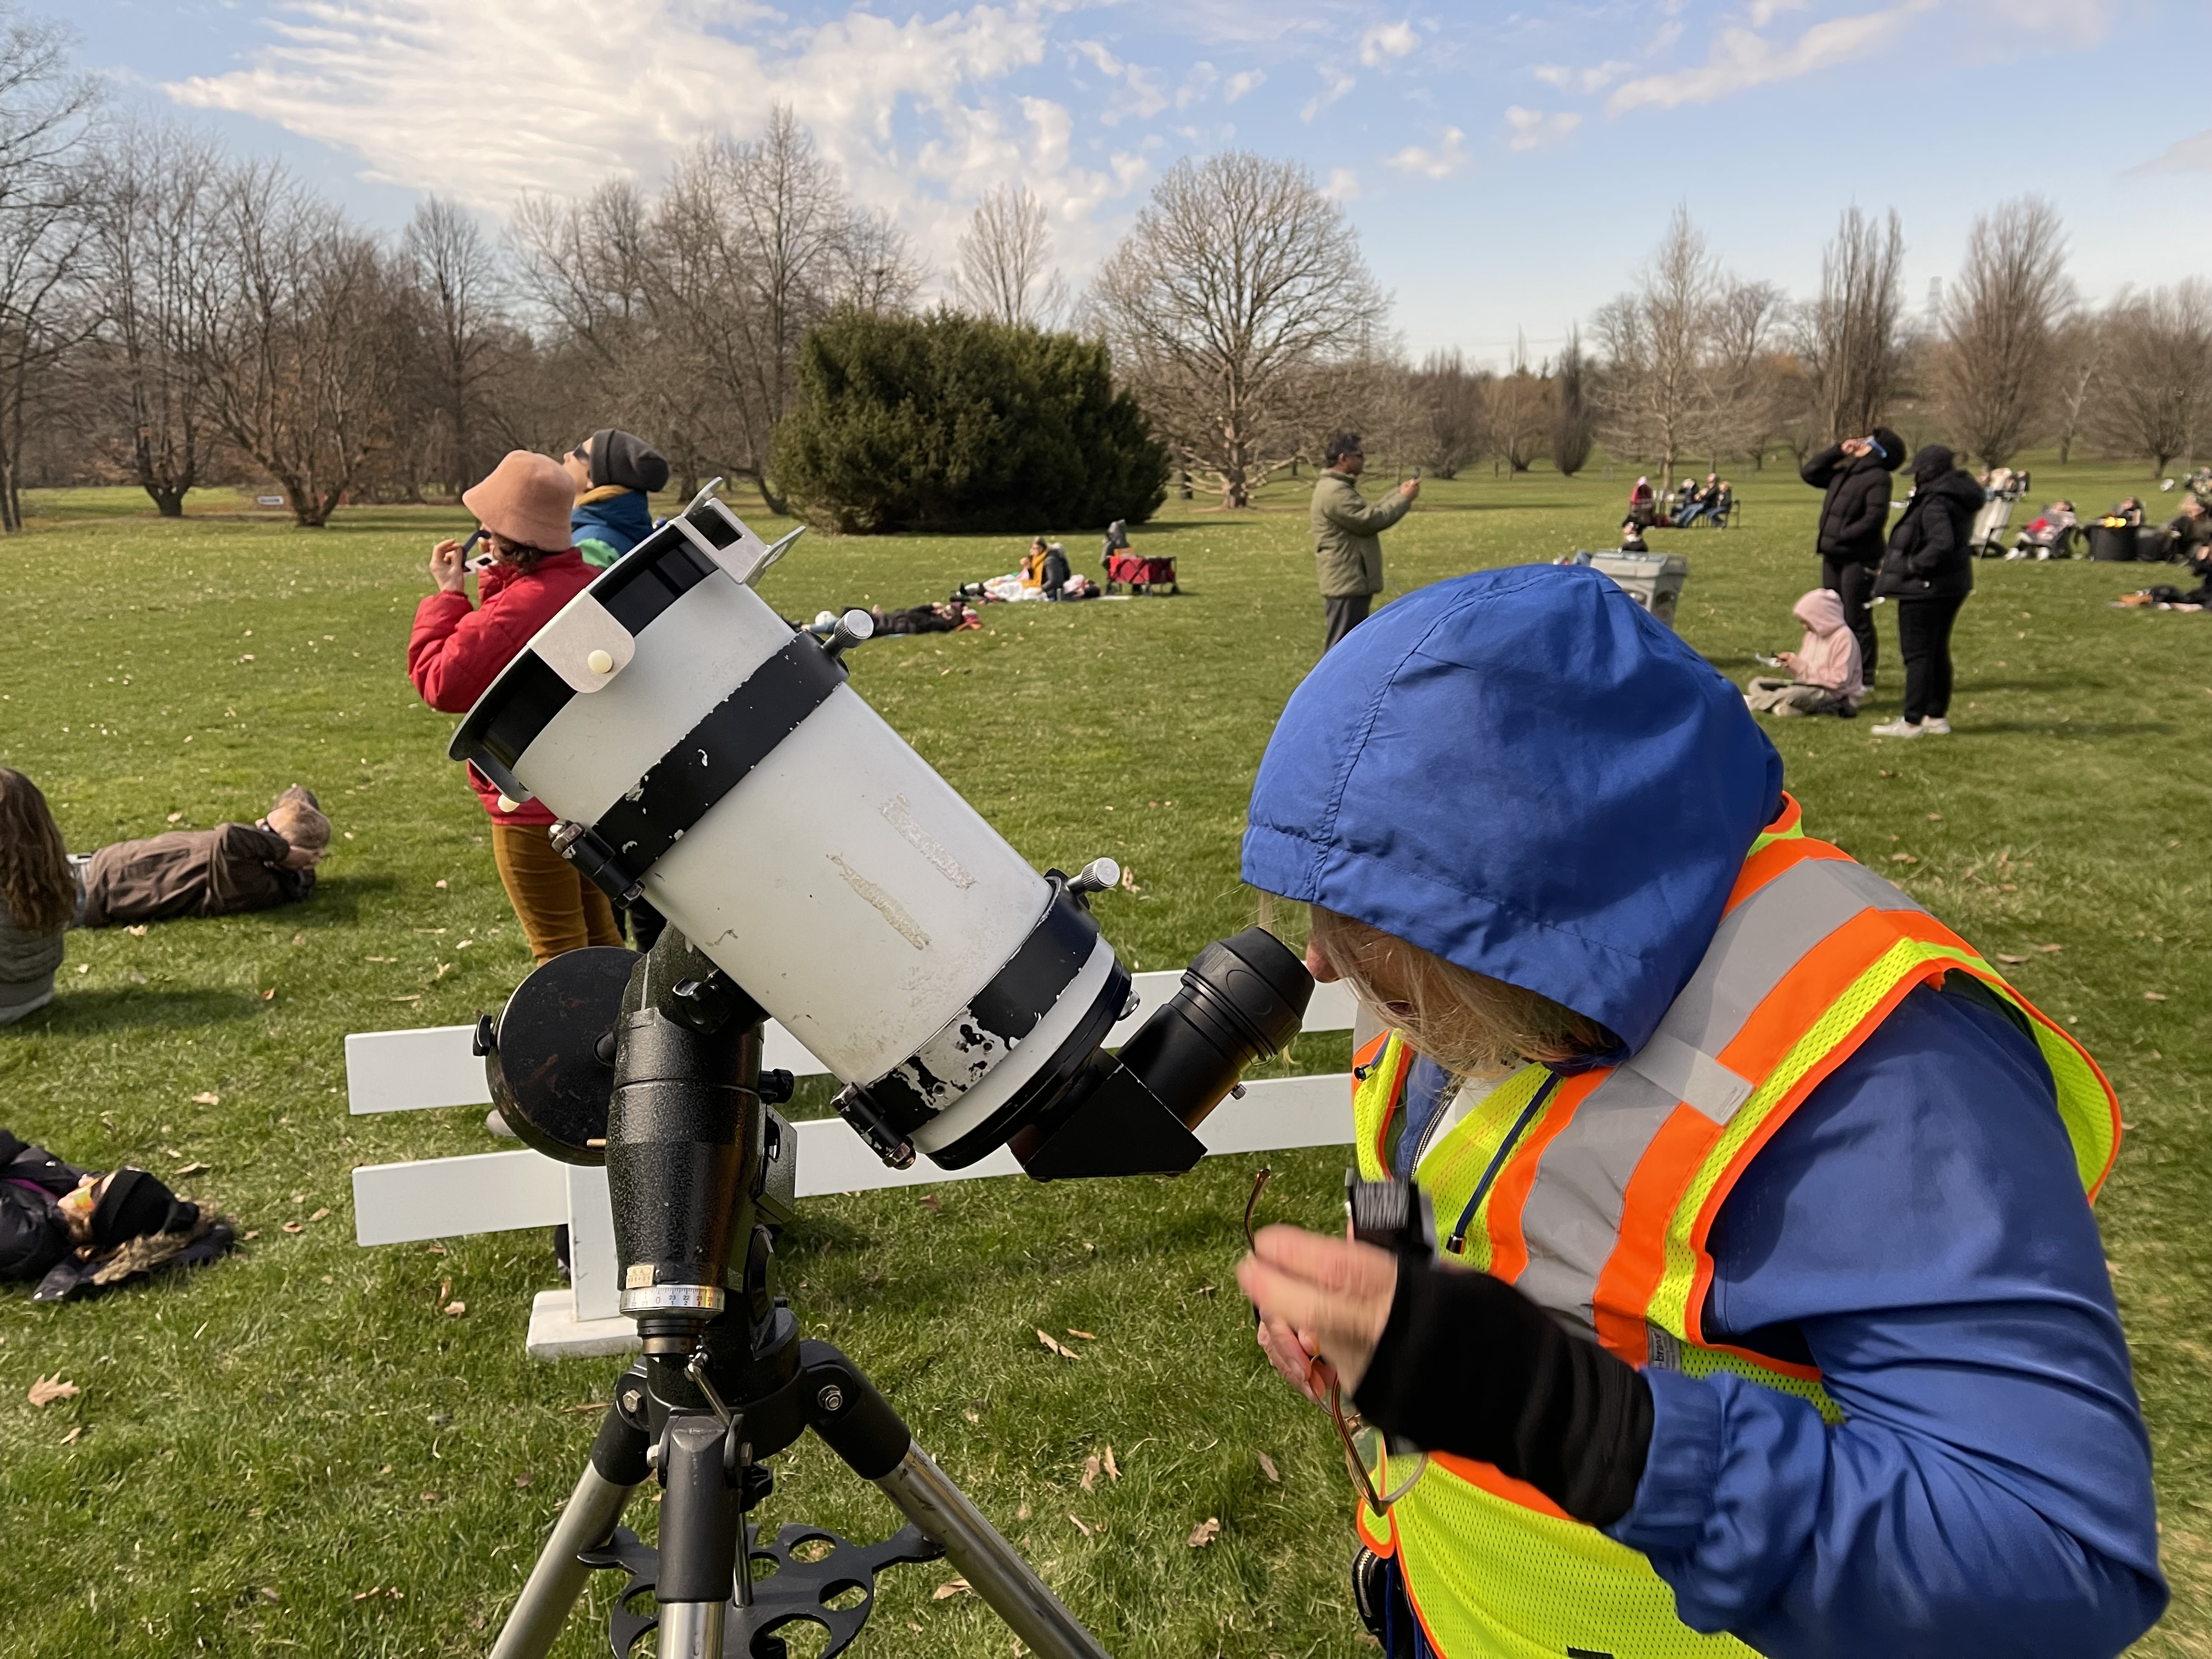
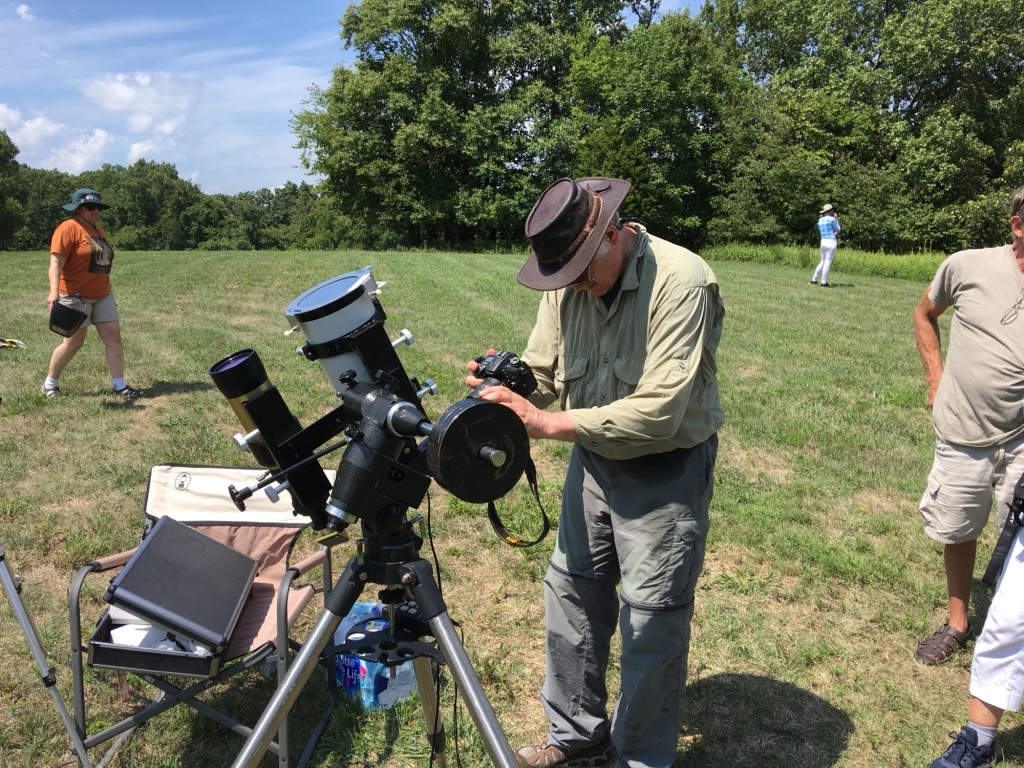
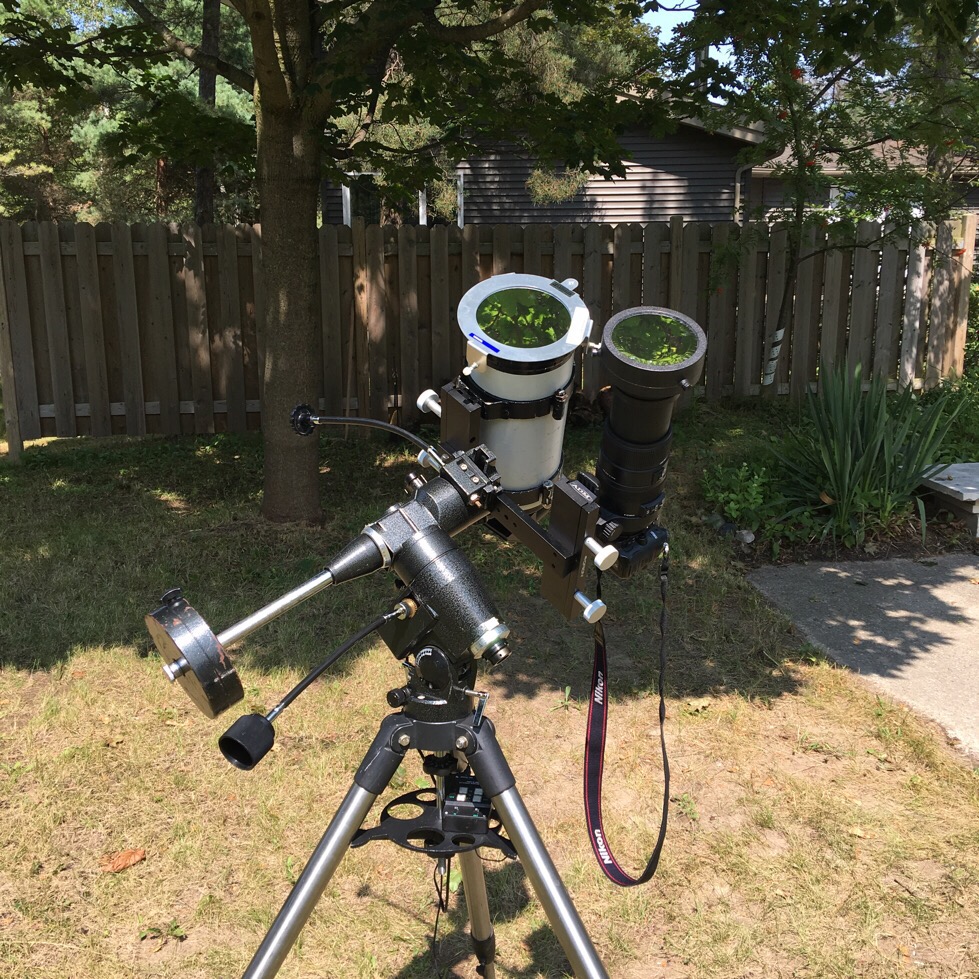
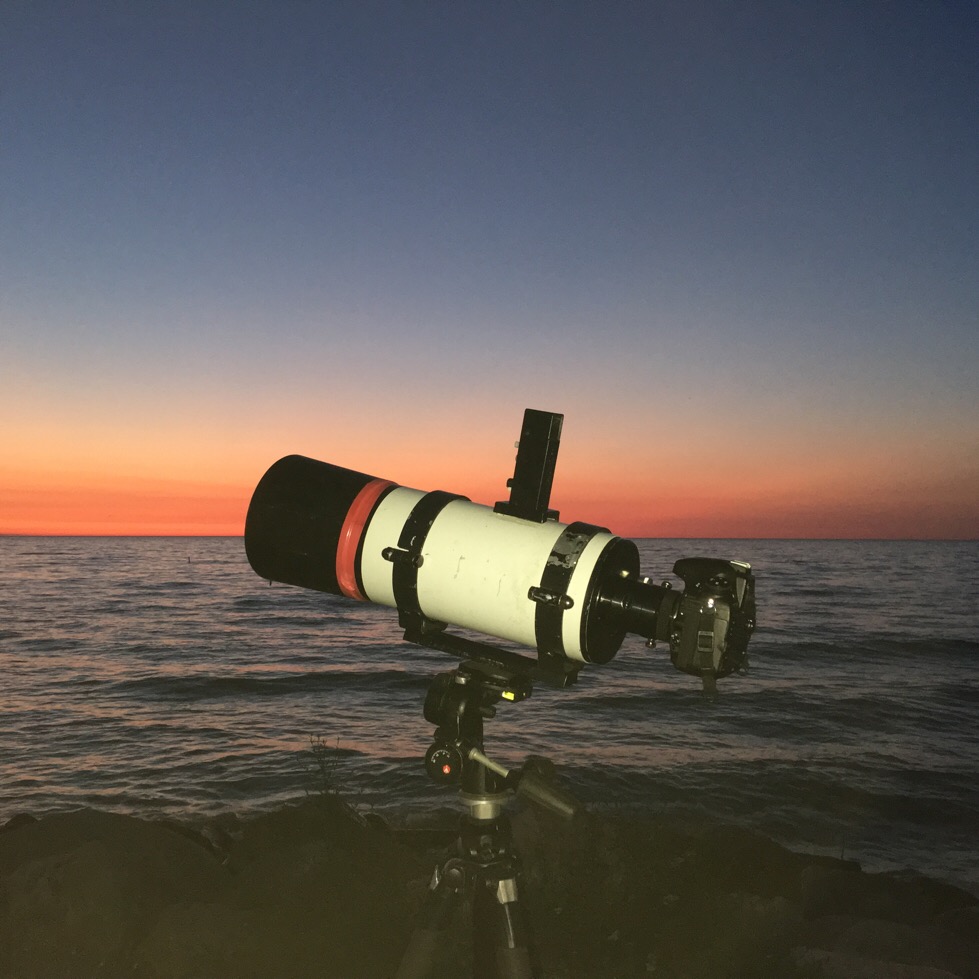
My little 5” Meade Terabeam Maksutov Cassegrain telescope went together very quickly, and I did an approximate north alignment of the German equatorial mount, but on a completely cloudy day that kind of thing is iffy at best. I must admit that as an amateur astronomer I’m not terribly interested or capable of doing alignments. I have never been really able to get a good alignment on my telescope mounts. I have a lovely EQ 6 mount that is currently underutilized, and the smaller, beaten-up black mount (is an EQ4? I don’t know) that I use for the Mak-Cas. I set everything up, and was satisfied that it was going to be a workable telescope for public viewing. Unlike most 5” Meade telescopes, this telescope has a custom 2” optical back, which allows for 2” eyepieces to be fitted, as well as full frame DSLR cameras. For the eclipse I set up a 2 inch eyepiece so that the public could view the eclipse through the telescope when safely fitted out with an aluminized mylar solar filter

Shortly after noon I got a call from our communications specialist Cassandra who wanted to see if I could come to a different part of RBG and do an interview with the CBC. RBG owns and manages a large set of properties, and the prospect of having to drive for 15 minutes from site to site just before the eclipse started did not necessarily appeal. However, I thought I had better do my duty as Director of Science, responsible for science communication. When I reached the gardens in Hendrie Park, I found that the Ontario Science Centre had set up an interpretive table and were working with grade 12 students on interpreting the eclipse for the public. A CBC video crew was also there to transmit their impressions of the eclipse and the Ontario Science Centre efforts. I did two short interviews with the CBC crew about 20 minutes apart, and then popped back into my car and headed back to the Arboretum. While I was on the road to the Arboretum the eclipse had started. I was back at the Arboretum about 10 minutes later. At this point things were still completely cloudy.

I started working with the telescope to see whether I could catch any kind of glimpse of the eclipse, and I was also equipped with eclipse glasses. It was some time before the clouds started to show some blue and break up, but they did. About 10 or 15 minutes before totality we started seeing good views of the sun through light, high cloud. There were even breaks where some parts of the sky were completely clear. The clouds were moving quickly, and it made for a very dramatic atmosphere, would we or would we not see the eclipse in totality?

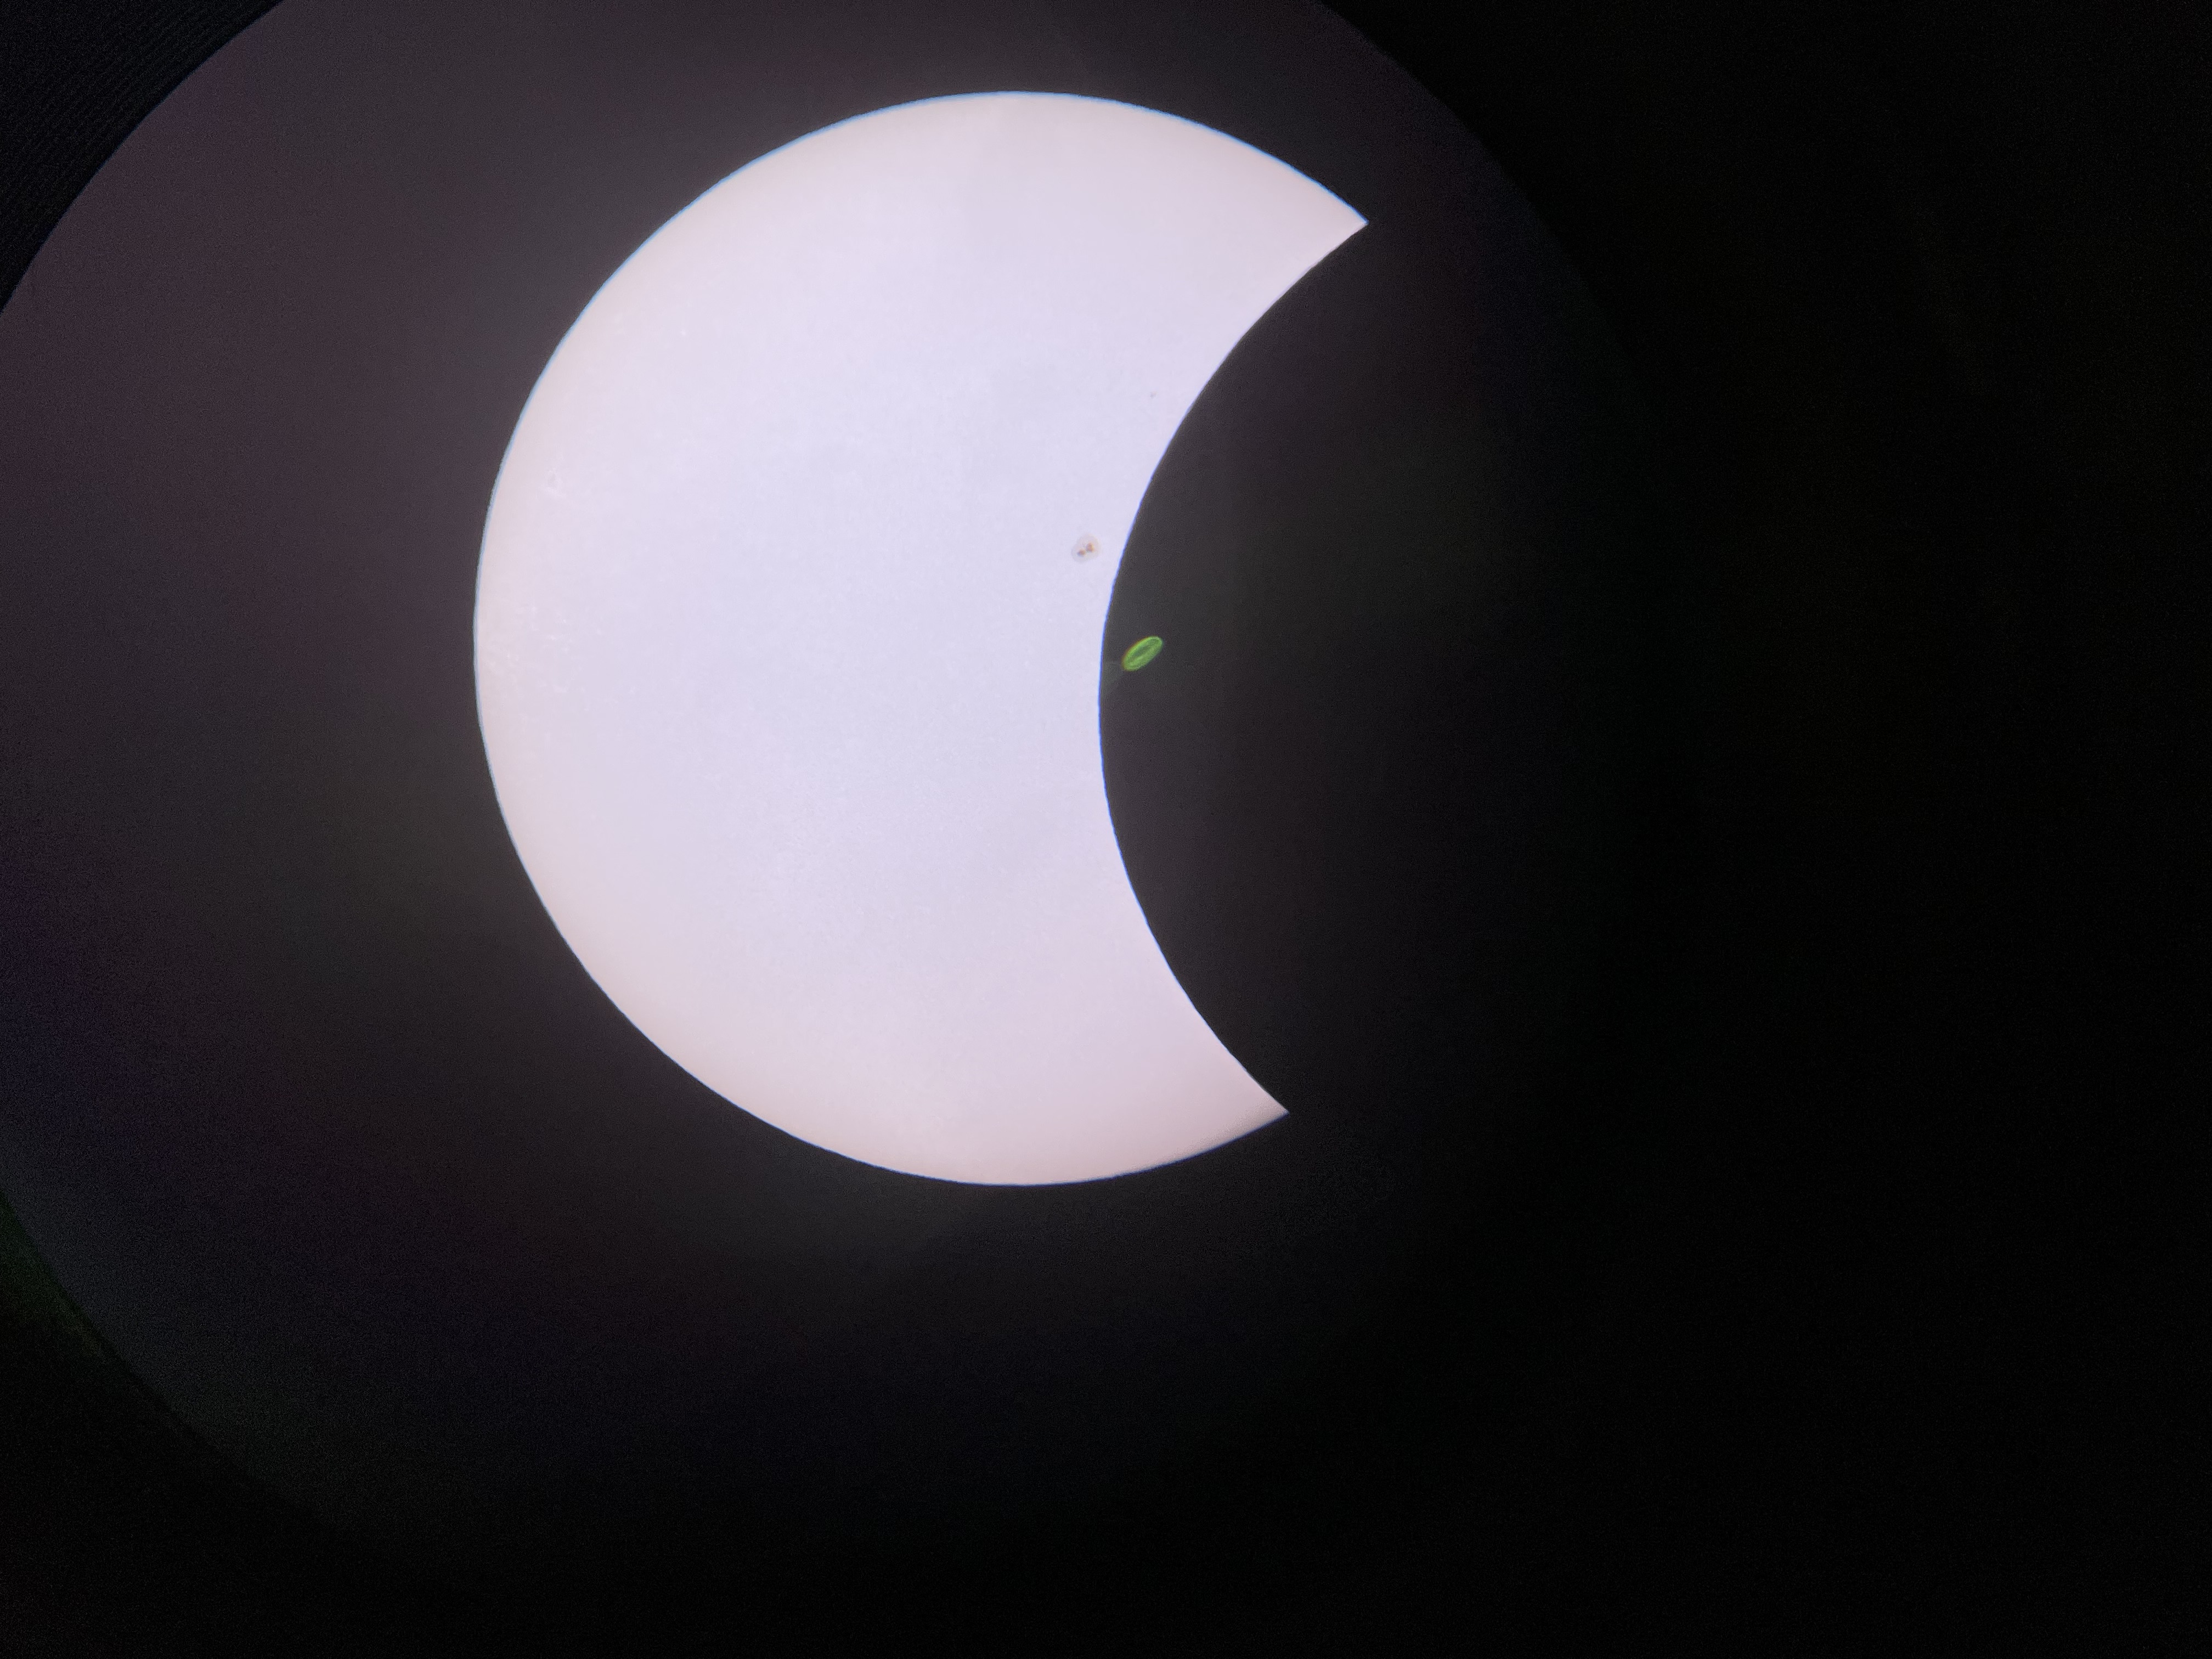
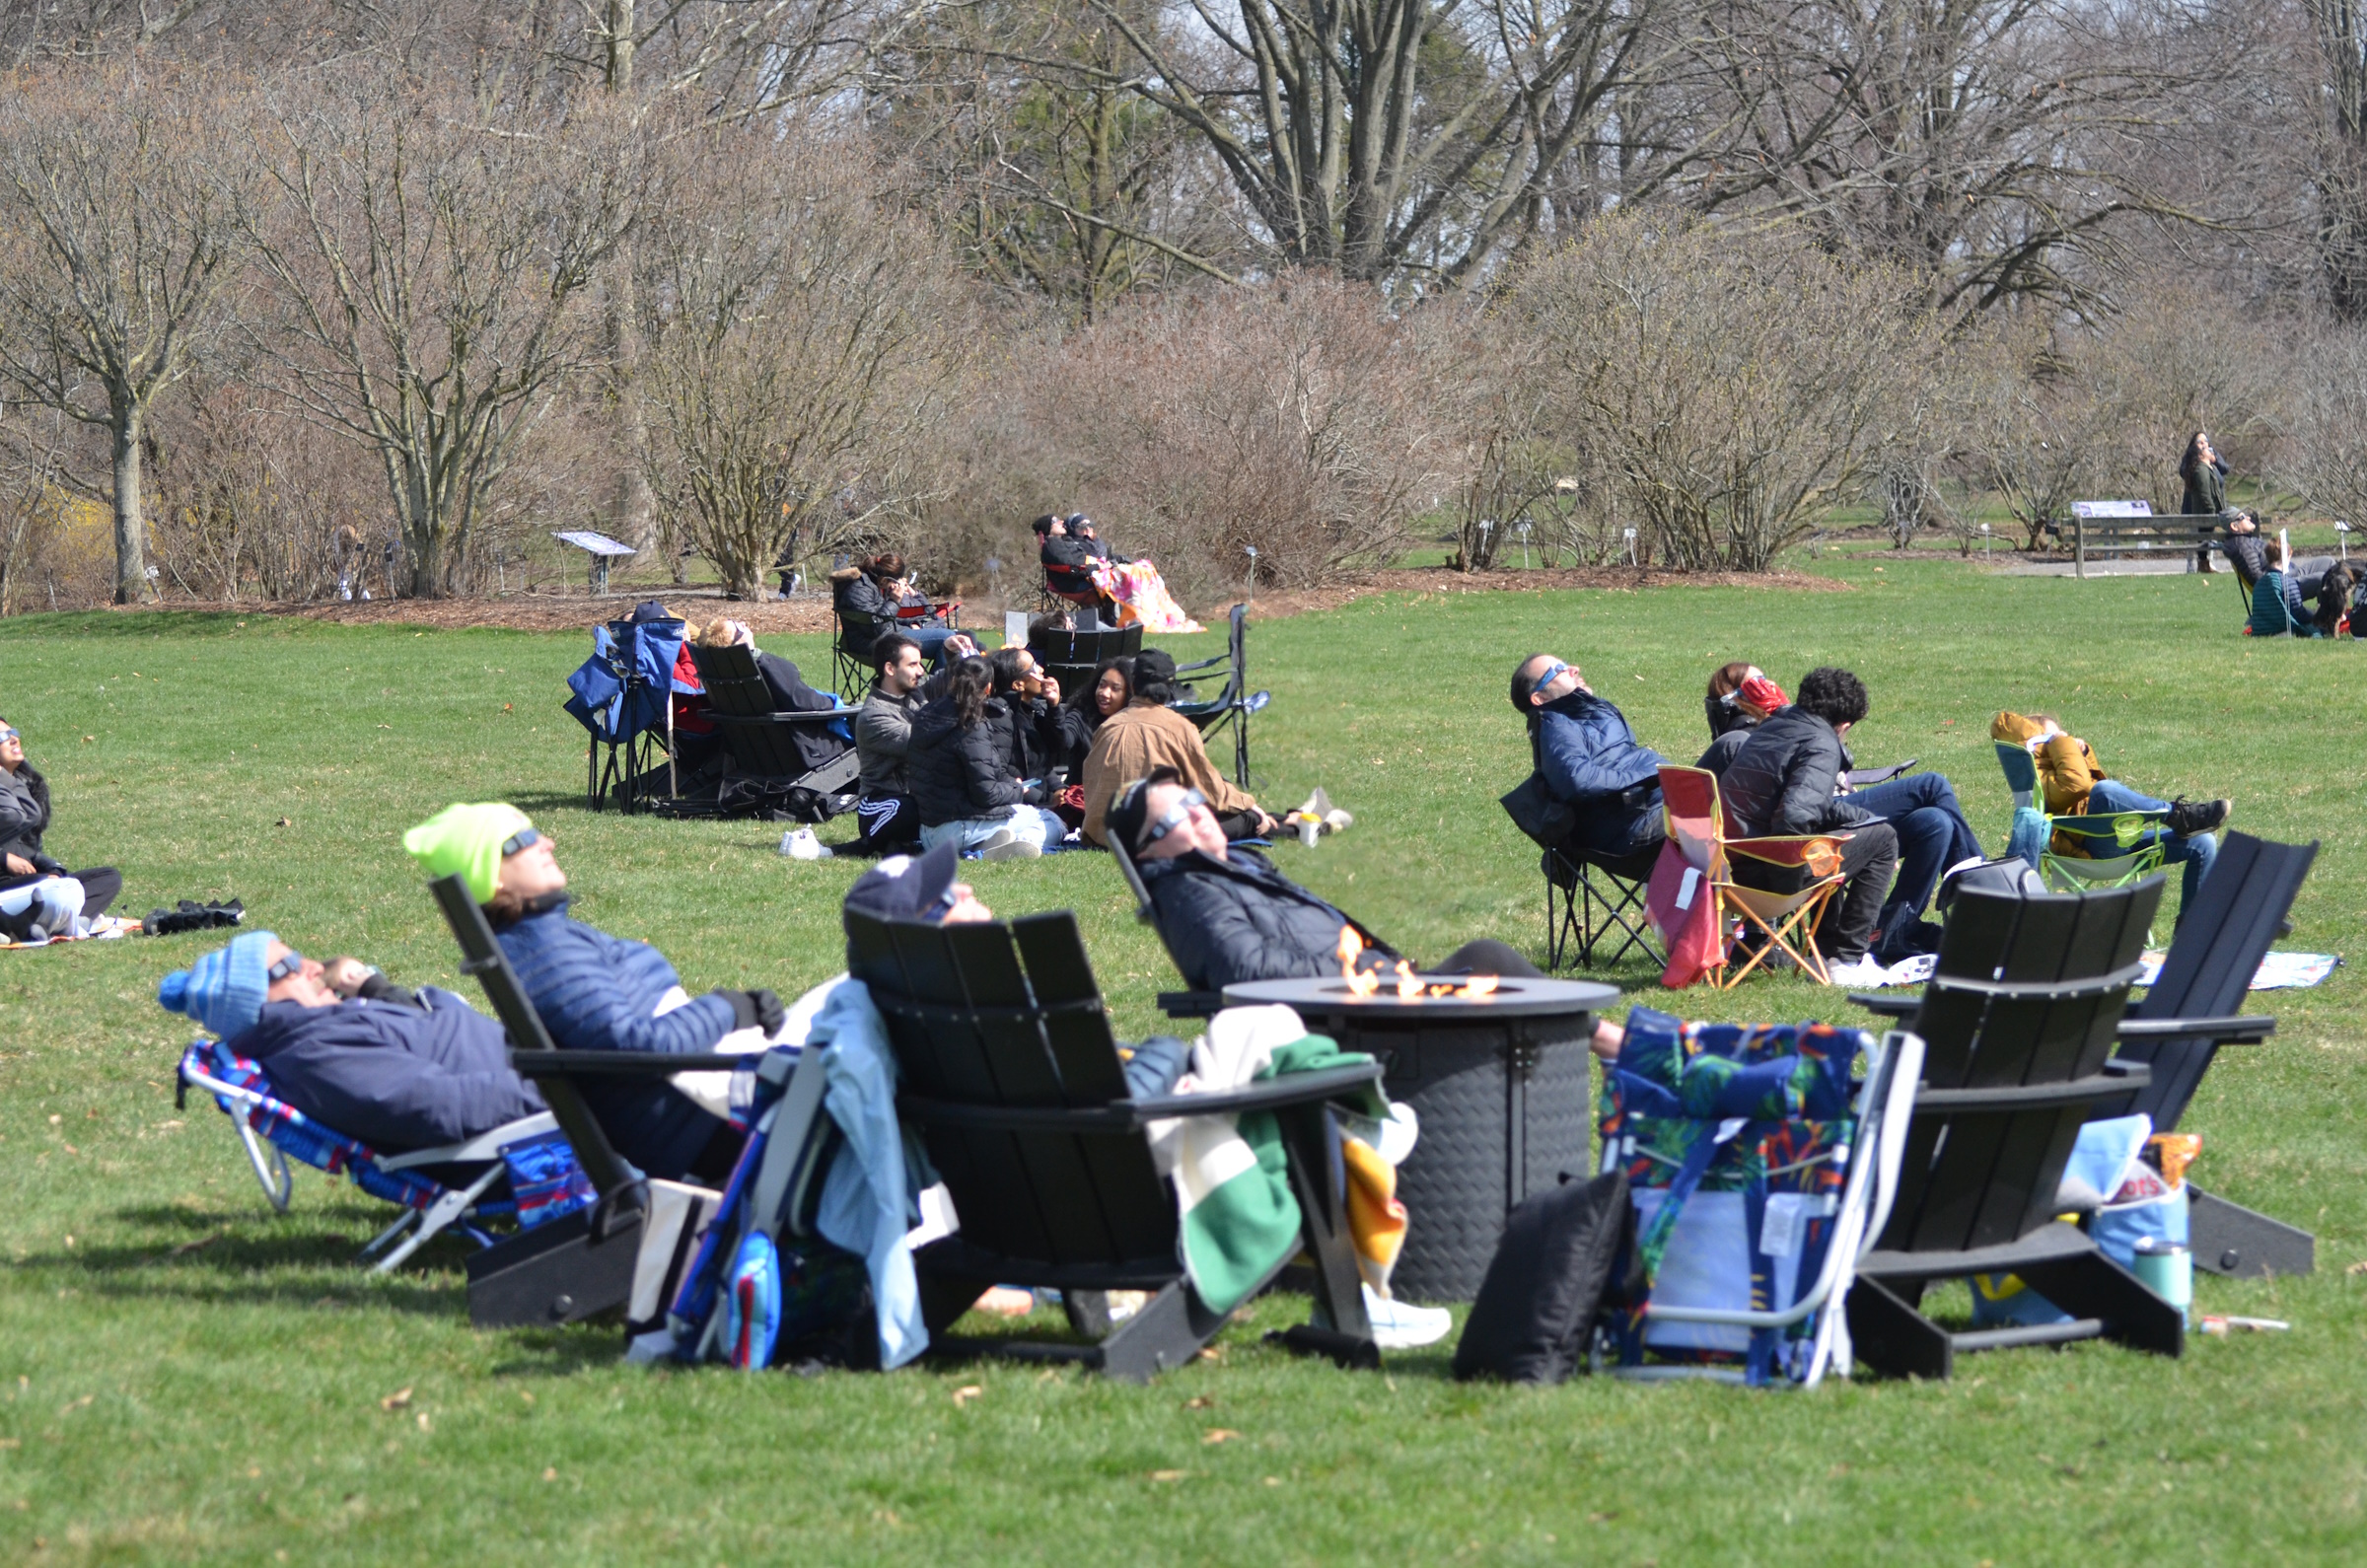
People started to line up to view the partial eclipse with the telescope, and there were a lot of very positive comments about that experience. A couple of nice sunspots made the view of the sun more interesting than a non decorated solar disk would appear.

The partial solar eclipse digiscoped through the 5″ telescope with an iPhone 12. The green object is an artifcatual internal reflection.

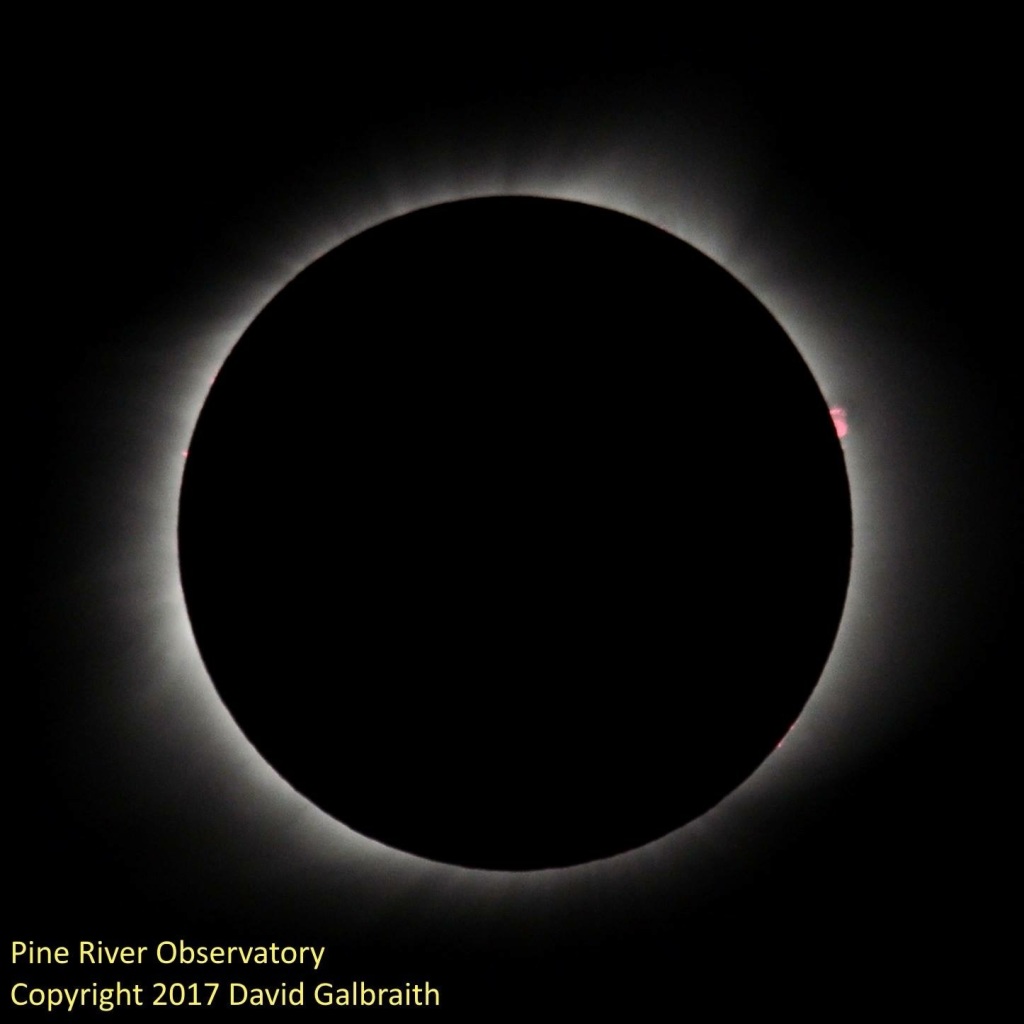
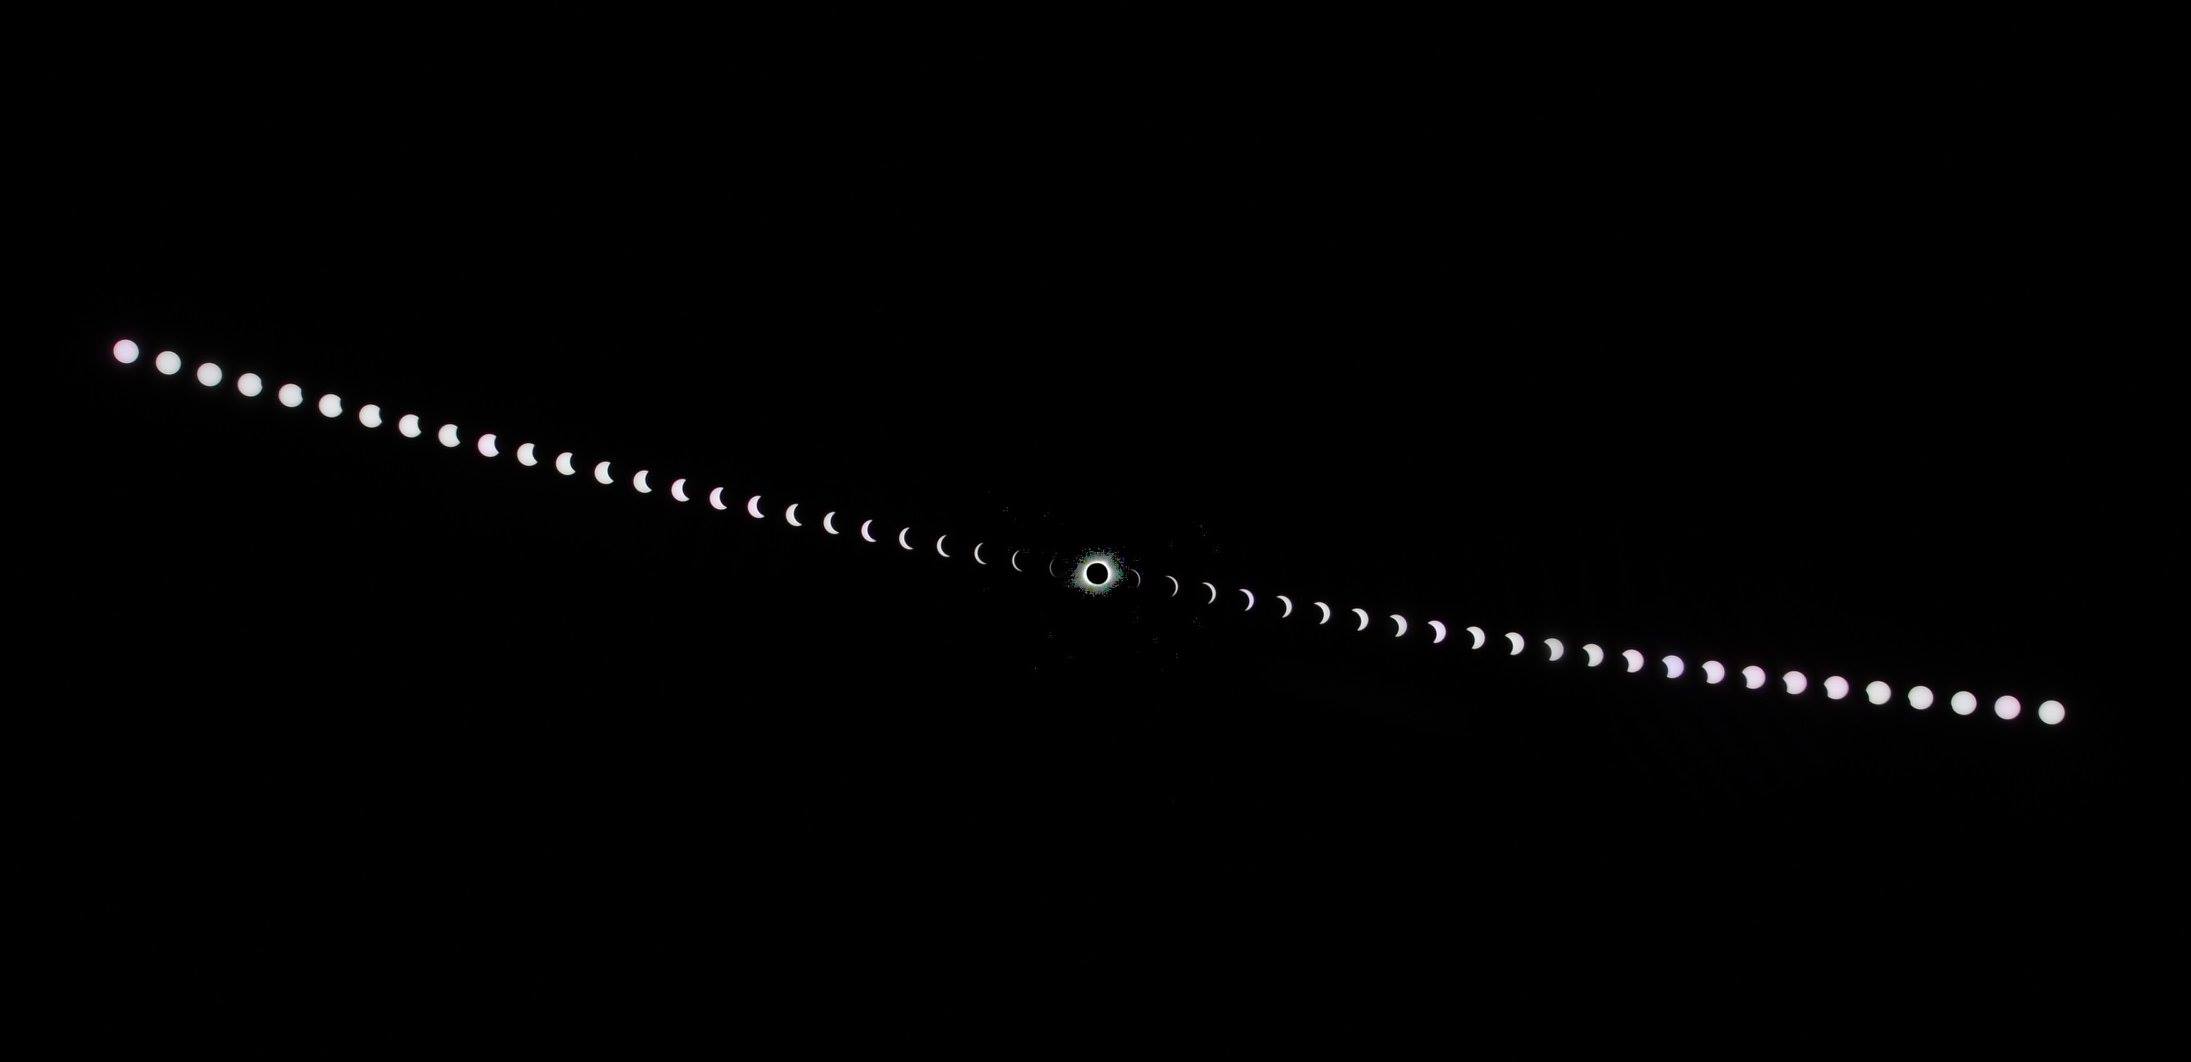
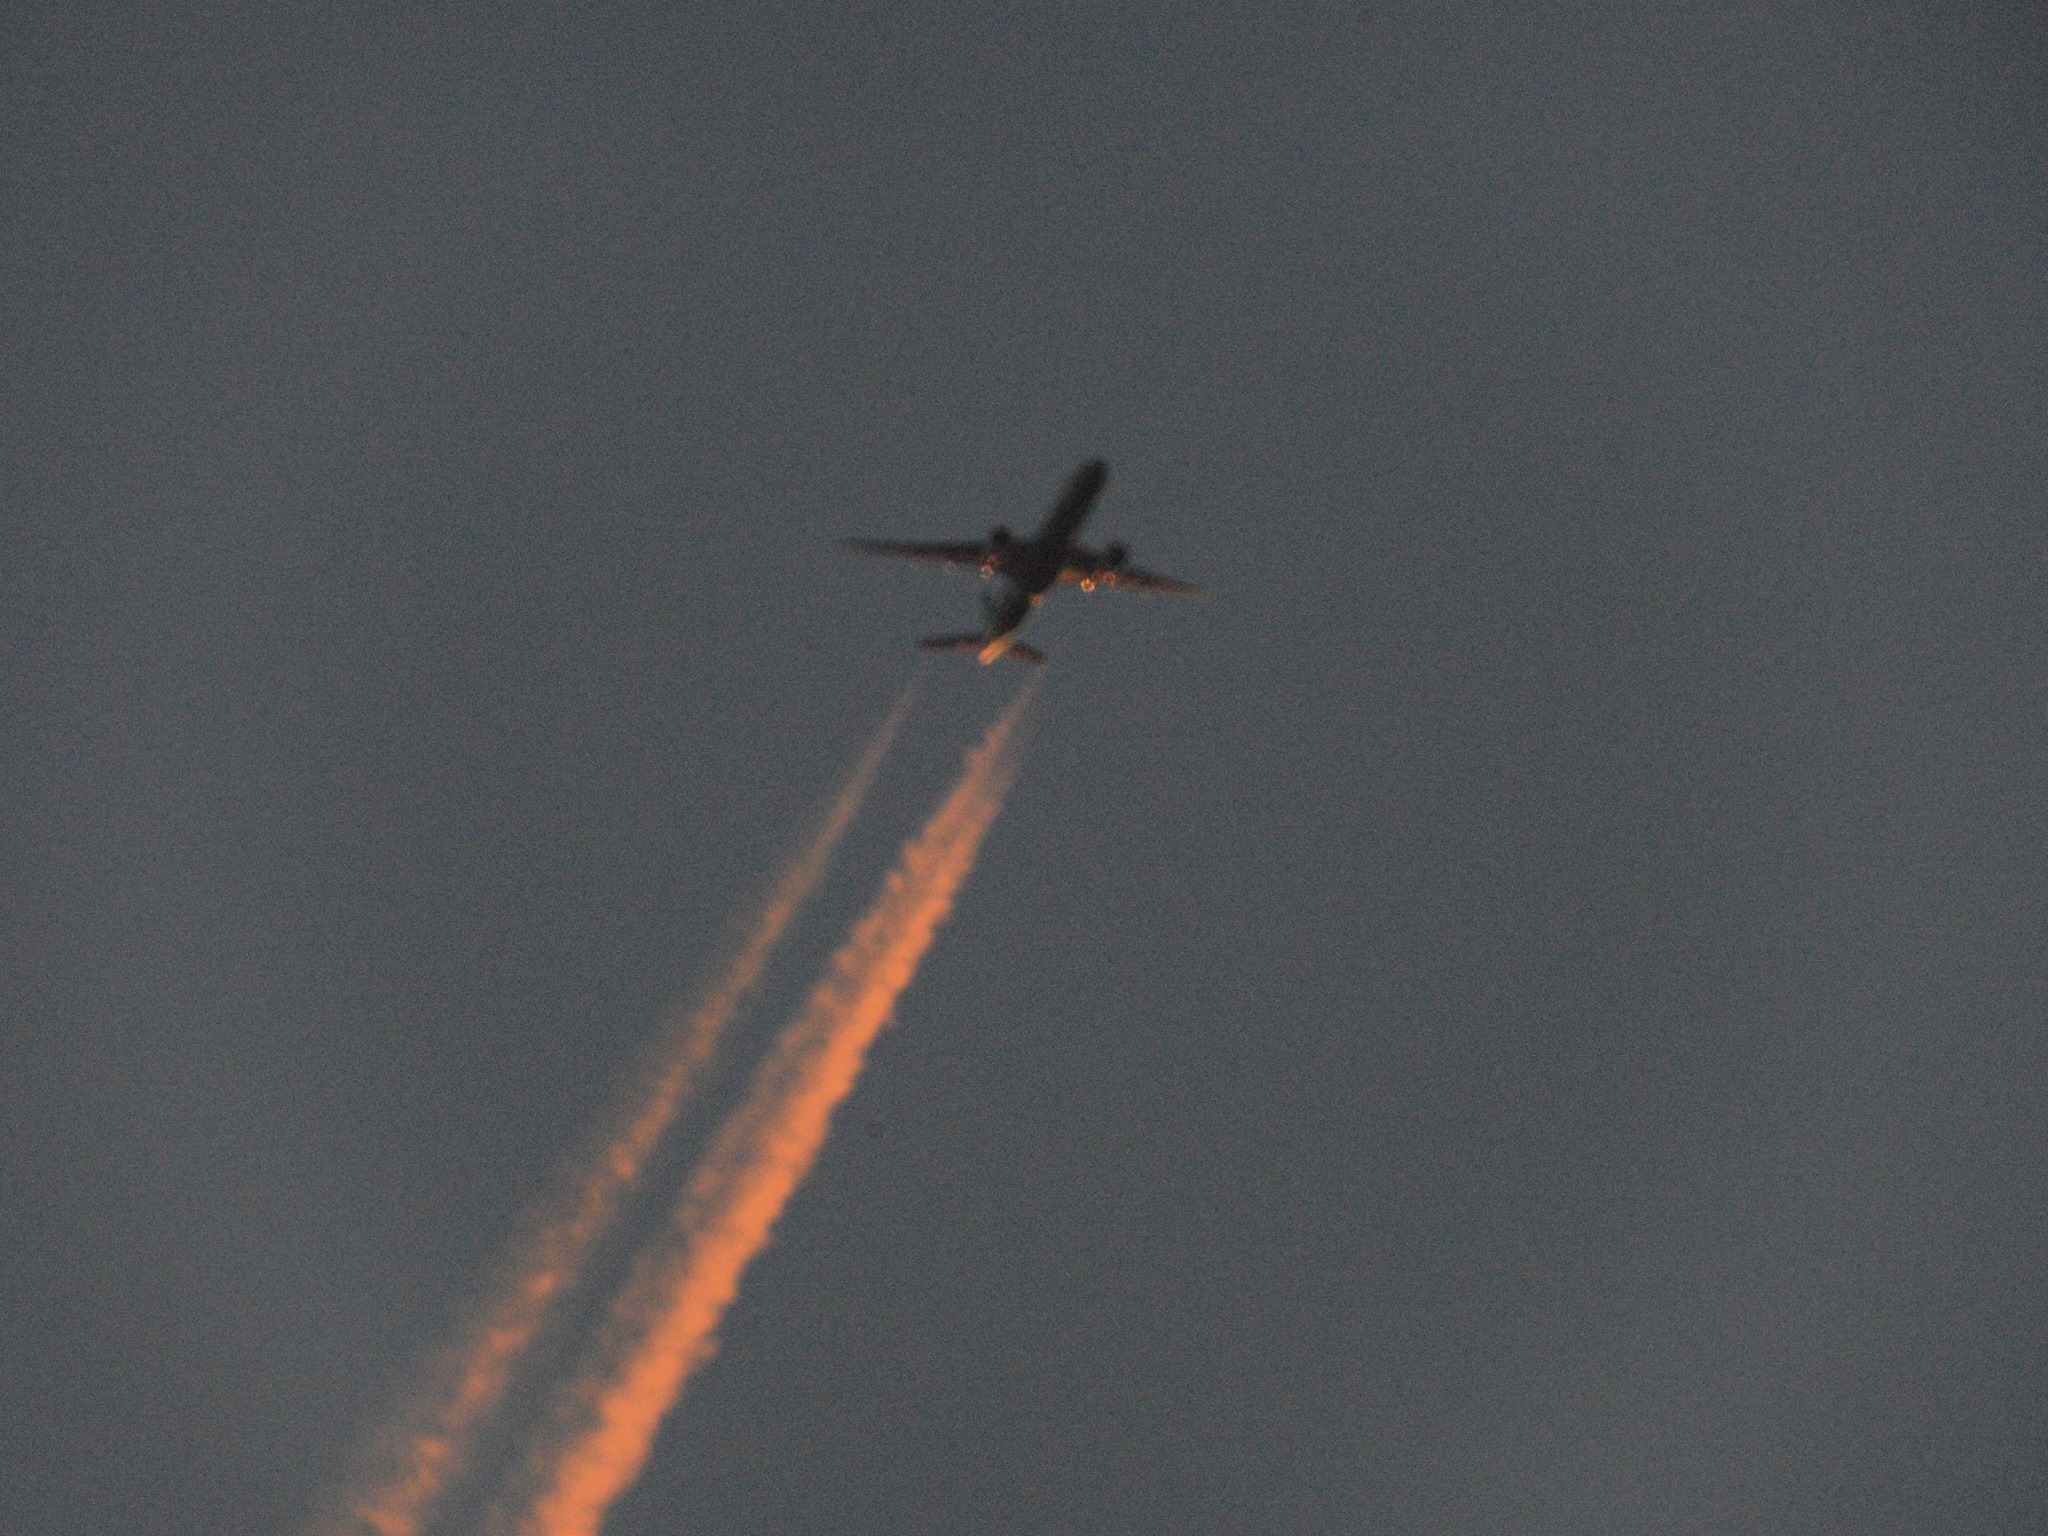
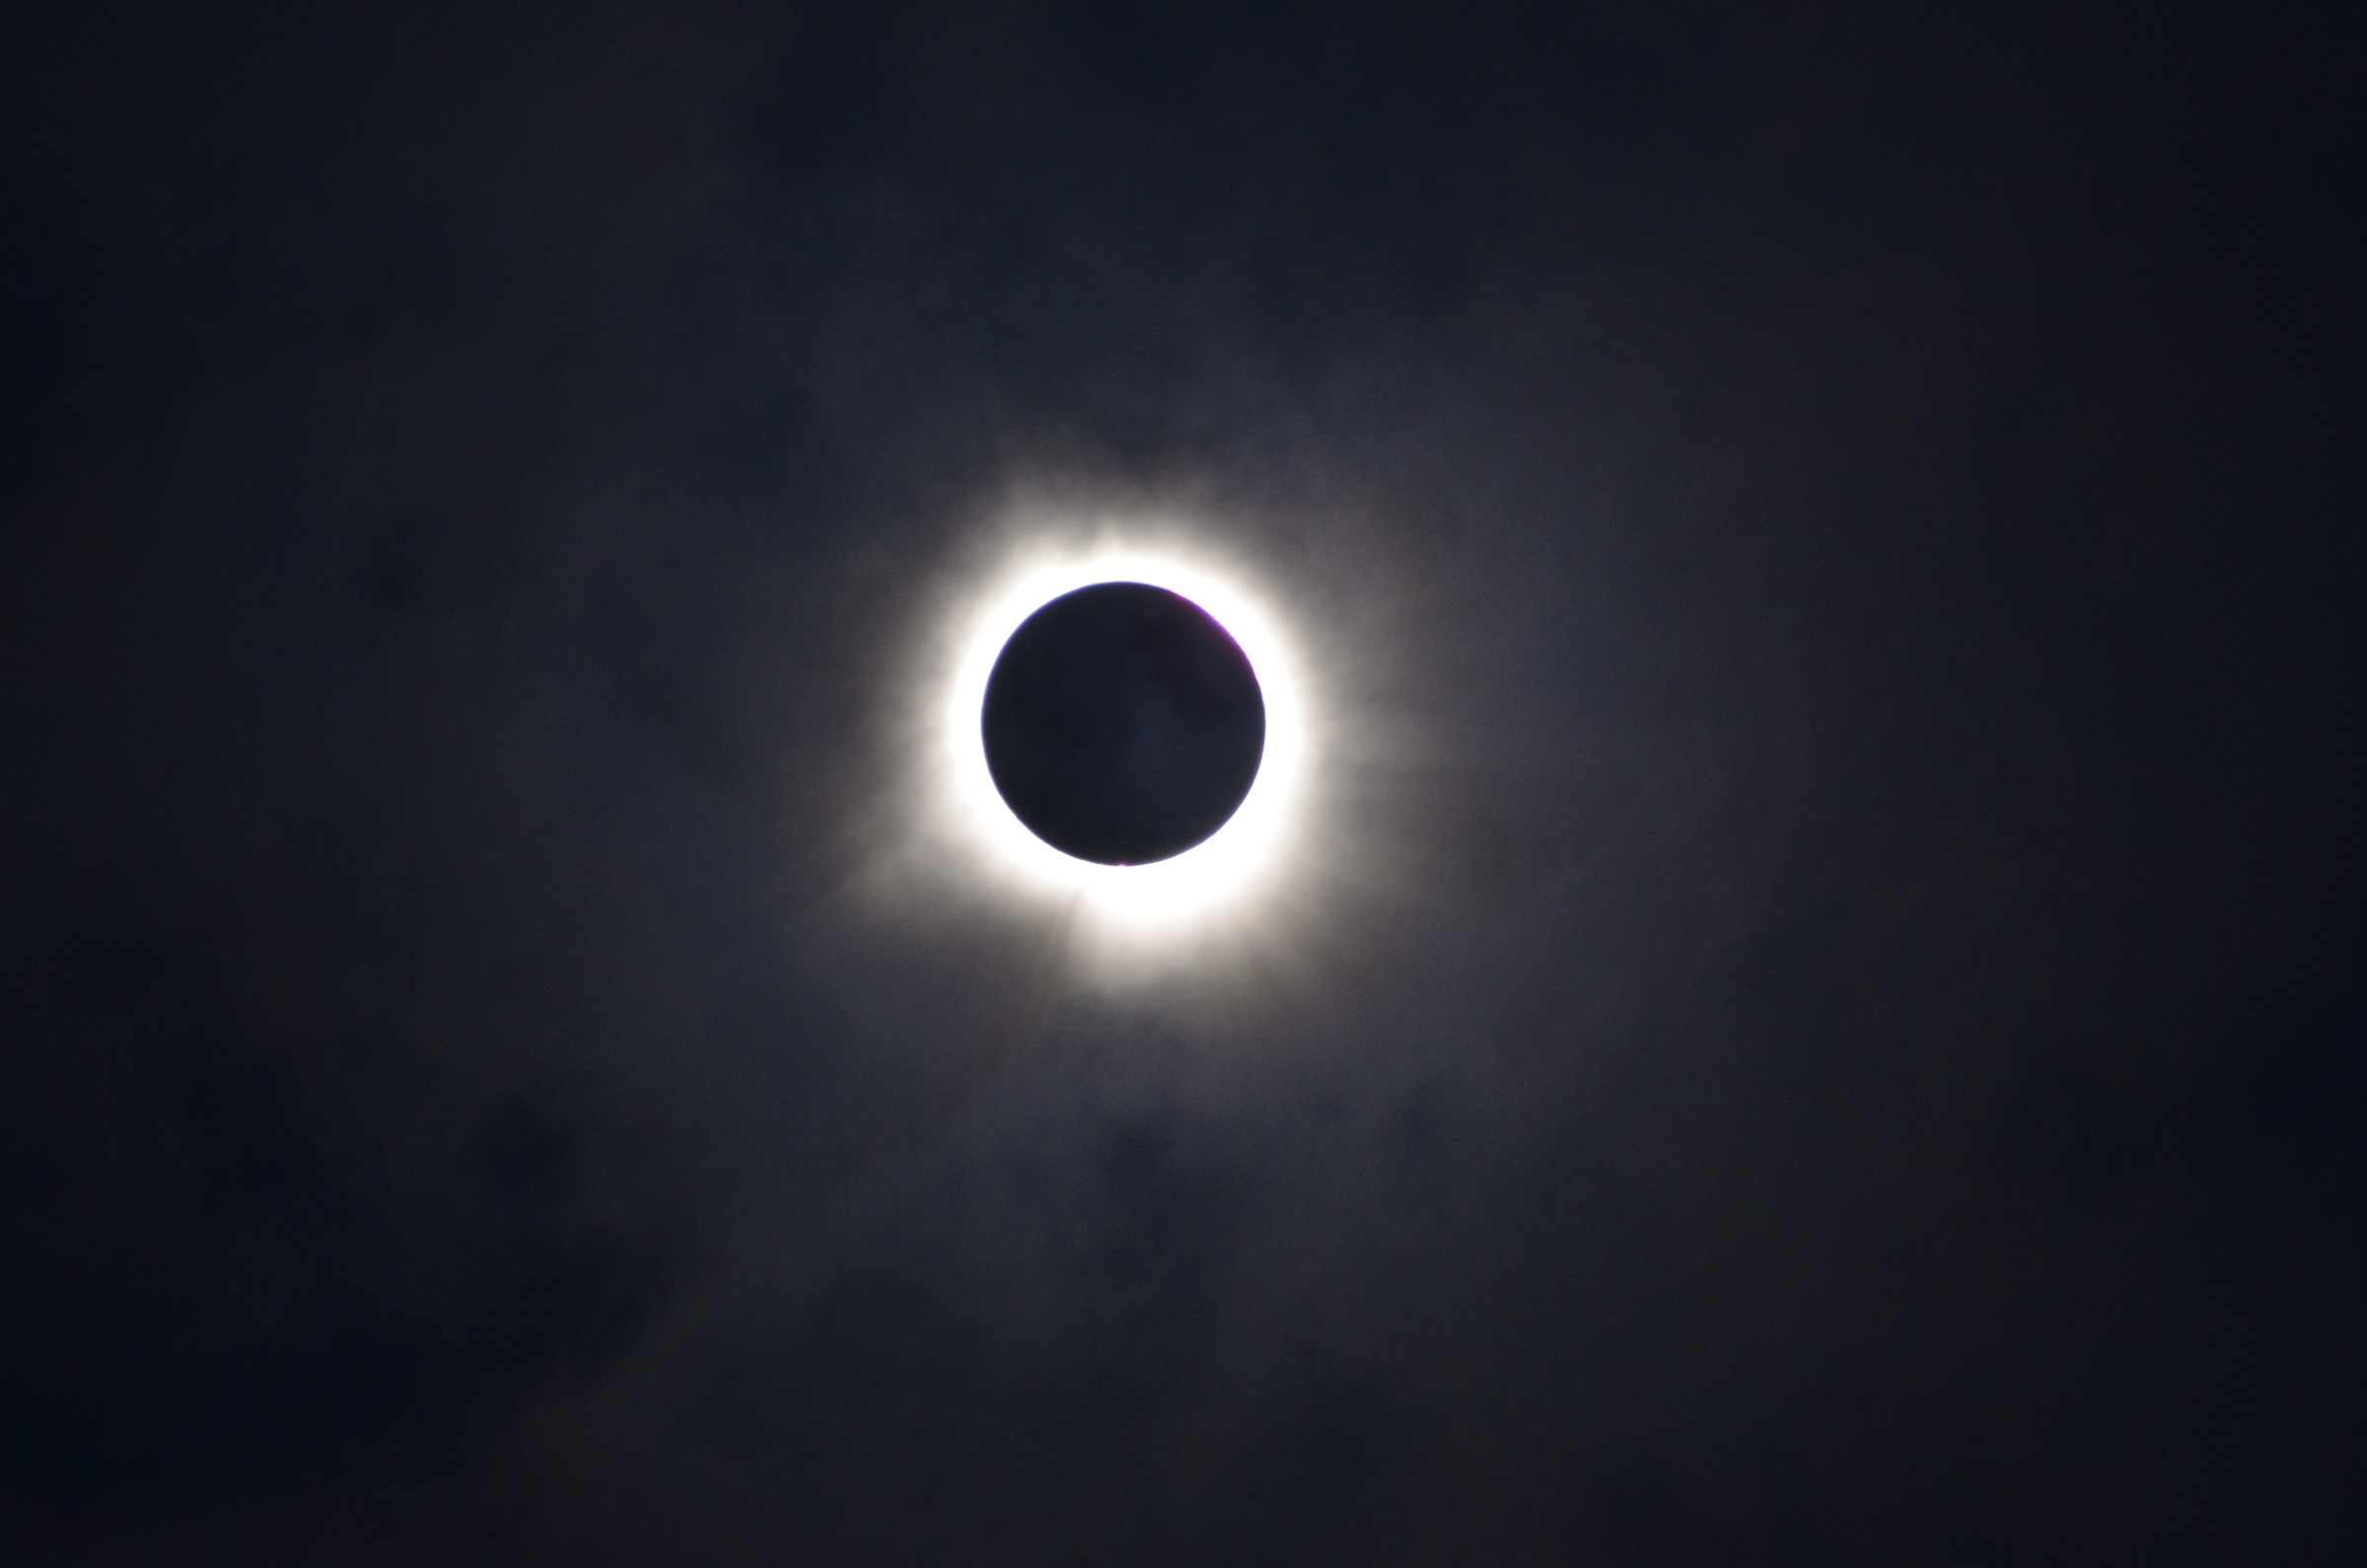
Just before totality, the clouds opened up and while there was high cloud during totality from our point of view we had a pretty good view of totality. It only lasted 87 seconds in the arboretum, a very short experience. But, it was thrilling, and I was able to get a few good photographs using a handheld Nikon camera and a fifth 150 to 500mm telephoto lens without filter out totality.

After totality and the sun burst through again there was just a lot of ooohs and awwws, and some applause, as everyone put their eclipse glasses back on and thought about the experience they had just had. Over the next hour I continued to offer viewing through the telescope, which was convenient but did need to be realigned manually every couple of minutes, as I did not have a motor drive working. While someone inconvenient it did work, and it meant I had to be on hand to make sure that people were looking at the sun safely. I should note that I have a nice 60 mm Coronado Solar Max Hydrogen alpha telescope, but without a mount tracking the sun I’ve found it too complicated to used for a public event like this.

Totality in Hamilton, Ontario!

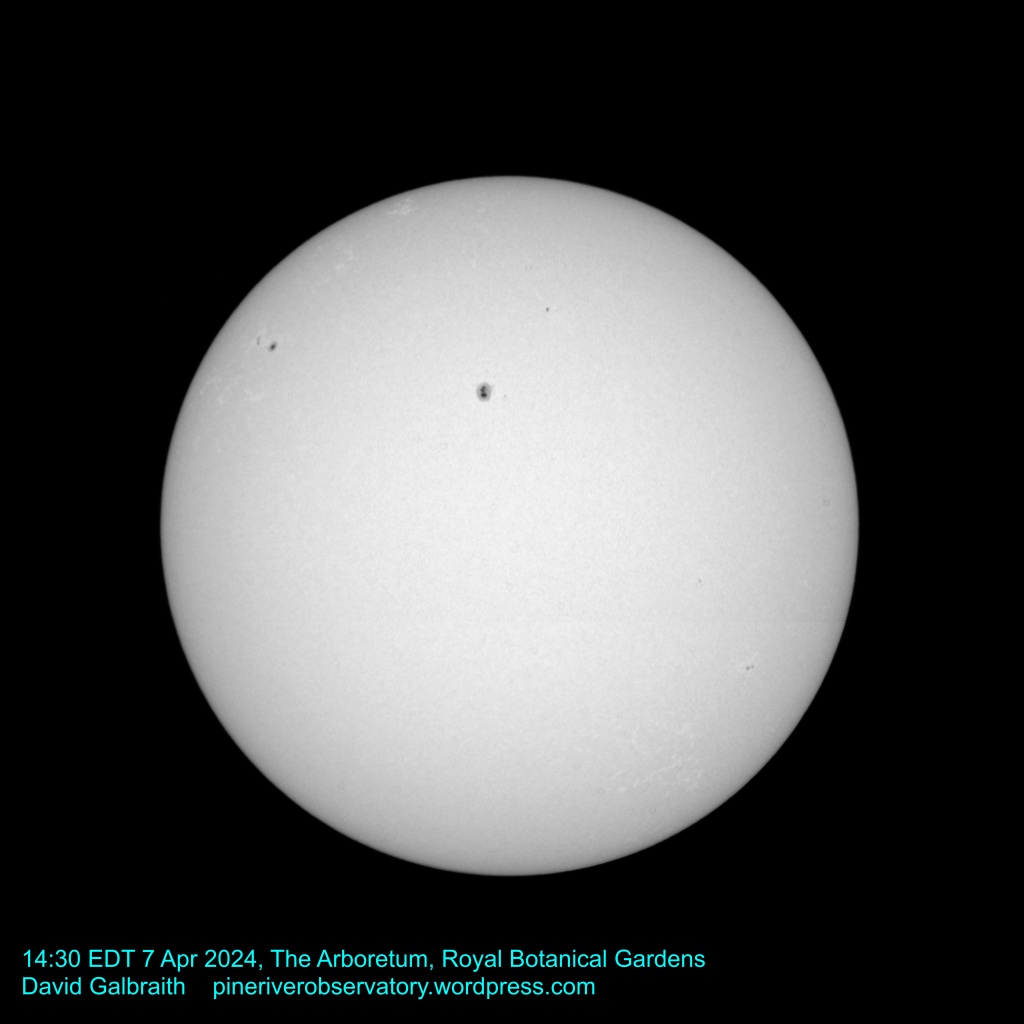
I took a few more photographs of the sun with a 300 mm telephoto lens with a solar filter on it, and as the sky lightened up people gradually started drifting off. By the time the eclipse was completed the vast majority of people had left for home.

Eclipse-watchers in the RBG Arboretum, chilling beside firepits!

This was an exciting total solar eclipse despite the clouds. The crowd was happy, the views were good even with high cloud at times, and it ranks up with the experience I had in 2017 of a total solar eclipse viewed in Missouri. That was a longer totality, but the environment was quite different. Both were worthwhile. I hope that if anyone has an opportunity to view a total solar eclipse they will make it a priority. While not common, these do not have to be once in a lifetime experiences if you are willing to travel.

Safe viewing!

The 2024 Total Solar Eclipse, Part 1

Observing the 8 April 2024 Total Solar Eclipse at the Arboretum of Royal Botanical Gardens (Canada) in Hamilton, Ontario.

The total solar eclipse of 8 April 2024 that swept across North America caused an enormous public and media sensation. Millions of people were able to take in this beautiful natural phenomenon.

Here at Pine River Observatory (which is both virtual and portable) I’m going to post a couple of blog entries about my experience with the 2024 eclipse. I had the wonderful opportunity to participate in preparation for and leading the programming of a visitor experience for the eclipse at Royal Botanical Gardens (Canada), in Hamilton, Ontario, where I serve as Director of Science. In this first blog post describe the preparations for the event, which was held in the Arboretum of Royal Botanical Gardens (Canada) on the afternoon of April 8th.

Preparations for the event actually began about three years ago. I had traveled to the United States to witness the 2017 total solar eclipse that was sometimes called the Great American Eclipse. I joined friends south of St. Louis, MO, and experienced my first total solar eclipse. I also had the honour to serve as interpreter and observation guide for the group, which included members of The Explorers Club, St. Louis Chapter.

Members of the St. Louis Chapter of the Explorers Club and my little telescope set-up watching the 2017 total solar eclipse in Missouri.

The 2017 eclipse was a chance to prepare solar observation telescopes and some camera equipment to record the event. That event went pretty well, and I was excited to capture a variety of images. I also demonstrated that my small telescope, a 5 inch Meade Terabeam Maksutov-Cassegrain OTA with a two inch Jim Weggat optical back, performed very well for visual observations and photography when equipped with a mylar solar filter from Kendrick.

One of my telephoto images of totality in 2017.

In 2021 I first started bringing the 2024 eclipse to the attention of the interpretive and planning staff at Royal Botanical Gardens (Canada), with information about the path of totality and its duration. The Arboretum at University of Guelph was just inside the path of totality, with eclipse websites indicating 87 seconds of totality could be expected there. It was not hard to work with online ephemeris sites and get the direction and the elevation expected for the sun and moon at totality. This would be just about southwest, at 45° elevation.

Serious planning for the event at the Arboretum began in mid 2023, when our director of business development and I started to discuss just what was practical and possible on the day. While the astronomical portion of the eclipse was very predictable, the wildcard in all of this was the weather. We were expecting a 60% probability of being clouded out on the day of the eclipse. Historical weather information, however, is proving to be somewhat unreliable in the era of climate change we are now experiencing. The two days before the eclipse the weather turned out to be cloudless and beautiful. Of course, we did not know this in our planning.

Prior to the eclipse itself RBG organized a presentation by eclipse chaser David Makepeace, of Toronto, a videographer who has identified himself as The Eclipse Guy. David has traveled the world many times to take in eclipses, and gave a wonderful presentation on eclipse chasing at RBG two weeks before the event itself.

We also teamed up with two other institutions in preparation for the eclipse. The Ontario Science Centre in Toronto included RBG in some of its own planning, and sent a team to RBG for the day of the eclipse. This was done in part because the Ontario Science Centre was to be outside of the path of totality. The other partner was McMaster University, which made the wonderful donation of several thousand eclipse glasses to RBG for distribution during our programming. In total McMaster University had over 600,000 pairs of eclipse glasses prepared and distributed free in Hamilton to give people a chance to observe the eclipse in safety.

To set up for the eclipse, it was decided that the Arboretum on the North Shore of Cootes Paradise Marsh would be the best place for an RBG eclipse viewing. It’s not that the Arboretum is anything particularly special, but it does present a large grassy area with a good view to the southwest. Our food services department set up a food truck, and our operations and events people set out chairs, tables, and even fire pits across the Arboretum so that visitors could relax and enjoy the event in style.

I decided to set up a couple of cameras and my five inch telescope 5 inch telescope so that people could take a look at the eclipse in its partial phases through the filtered telescope. On 7th of April, the day before the eclipse, I set up all of my equipment in the Arboretum and did a practice run with solar imaging, producing a decent visual light image of the solar disk.

The sun’s disk on the afternoon of 7 April 2024, just 24 hours before the total solar eclipse was to begin. Taken at the RBG Arboretum with the Terabeam telescope and a Nikon D5100 at prime focus.

I disassembled the equipment and packed it back up into my car for the overnight wait, and then arrived at the Arboretum around 11:30 on the morning of 8th April. It took a while to set up the equipment, but I decided to do a very simple thing with my telescope. Critical to any observed observations with a telescope is the telescope mount. In my case I have an old mount of about an EQ3 size (I’m not even certain), and I decided I was going to use it simply as a manually-moved German Equatorial manual mount. I made a rough north alignment, and then set up the optical tube assembly, the mylar solar filter, and eyepiece.

For camera equipment I had a Nikon D 7000 with a 150 to 500mm telephoto lens and yellow plastic solar filter. I used the handheld camera to take pictures of the sun and moon at various times. At totality, I removed the filter so that I could get photographs of the totality event.

And that was about it. I set up my relatively simple telescope, and during the day I was aided by several RBG volunteers, a wonderful group who come out to help at nearly every event. The wait was on to see if we would get an eclipse, because early on the morning of the 8th of April the weather forecast did not look very good. We had solid cloud until at least 1:00 PM, with totality scheduled for about 3:20 PM.

I’m going to pick up the story of the actual eclipse event in our next blog post. I’ll review the programming and experience of eclipse day, observations and the interactions with all of the public who joined us on the event, and share some photographs. We had at least 400 people attend. It’s not giving anything away at this stage to say that we did see a wonderful eclipse, the clouds cooperated in a rather dramatic fashion, and it was my impression everyone was very excited and satisfied that day.

Get Ready! A Quick Guide to Observing the 8 April 2024 Total Solar Eclipse in Canada

A time-series of the August 2017 Total Solar Eclipse I photographed in south of St. Louis, Missouri.

The April 8, 2024 total solar eclipse presents a once-in-a-lifetime opportunity for amateur astronomers in Canada to witness an extraordinary celestial event. By planning ahead, selecting the right equipment, following safety guidelines, and keeping an eye on weather conditions, you can maximize your chances of experiencing this breathtaking phenomenon. Remember that the memories and awe-inspiring moments you’ll capture during the eclipse will be cherished for years to come.

This blog post gives you general suggestions about viewing or photographing the eclipse, based on my personal experiences with the August 2017 total solar eclipse that I saw in Missouri.

1. Where Will the Eclipse Be Visible?

The April 8, 2024 total solar eclipse will be visible across a large portion of North America, offering Canadians an incredible opportunity to witness this phenomenon. The path of totality—the region where the sun is completely covered by the moon—will stretch across several provinces, allowing observers to experience the eclipse in its full glory. In Canada, the path of totality will traverse regions including Newfoundland and Labrador, Prince Edward Island, Nova Scotia, New Brunswick, southern Quebec, southern Ontario.

Totality – the period when the sun is completely blocked by the moon – varies from place to place. It will cover a narrow band of about 160 km across. The differences can be stark. Totality will not be visible in downtown Toronto, but will be in Hamilton. Even if you are not in the path of totality the sight of the moon obscuring the disk of the sun can be very dramatic.

Here’s a good guide for the details on-line: https://eclipse.aas.org/eclipse-america-2024

2. Recommended Equipment

A 5″ Terabeam telescope (the white ETX-125TB Catadioptric Maksutov-Cassegrain telescope on the left) and a Nikon digital camera and telephoto lens on an Eq-5 tracking mount, both equipped with mylar solar filters suitable to photograph a solar eclipse.

To fully appreciate the grandeur of a total solar eclipse, it’s crucial to have the right equipment on hand. While a total solar eclipse is a mesmerizing sight to behold with the unaided eye, using proper eye protection is essential to avoid permanent eye damage. A pair of certified solar viewing glasses or eclipse glasses are an absolute necessity during all stages of the eclipse, except for the brief period of totality when the sun is completely covered.

For those looking to capture the eclipse’s stunning moments, a digital camera or smartphone can be used to take photographs, but it’s important to use appropriate solar filters to prevent damage to the camera’s sensor. Solar filters designed for cameras or telescopes can help capture the intricate details of the eclipse’s corona.

If you’re an amateur astronomer with access to telescopes, consider using a solar telescope or a telescope equipped with a solar filter. These devices allow you to observe the eclipse in even greater detail, revealing sunspots, prominences, and the solar corona during totality.

There are also some very simple ideas that can make for a fun viewing experience. These include pinhole “cameras” that project an image of the sun onto a white panel or card from a small hole in a solid sheet.

3. Viewing in Safety

Safety should always be a top priority when observing a solar eclipse. Even a partially eclipsed sun can cause permanent damage to your eyes if proper precautions are not taken. Follow these safety guidelines:

Use Certified Solar Viewing Glasses: Regular sunglasses, no matter how dark, are not sufficient for observing the sun. Only use certified solar viewing glasses or eclipse glasses that meet the ISO 12312-2 international safety standard. Check for any damage or scratches on the glasses before use.

Inspect Your Equipment: Ensure that any equipment you use to observe the eclipse has the appropriate solar filters in place. Telescopes, binoculars, and cameras all require specialized filters to prevent harmful sunlight from damaging your eyes or equipment.

Monitor Children: If you’re observing the eclipse with children, make sure they also have proper eye protection and are aware of the importance of not looking directly at the sun without it.

4. Weather Considerations

While regions of Canada offer prime viewing opportunities for the April 8, 2024 total solar eclipse, weather conditions can play a significant role in determining whether you’ll be able to witness the event. It’s crucial to keep an eye on weather forecasts in the days leading up to the eclipse and to have a backup plan in case the weather takes an unfavorable turn. As the eclipse is taking place in early spring, for example, the chance that it will be obscured by cloud in Ontario runs about 50%.

If you’re planning to travel to a specific location to view the eclipse, consider selecting a spot with a history of clear skies during the month of April. Coastal areas may be prone to fog or marine layer clouds, so it’s wise to research local climate patterns before finalizing your viewing location.

5. Potential Challenges

While parts of Canada are fortunate to be within the path of totality for the 2024 solar eclipse, there are a few challenges to keep in mind. The farther you are away from the path of greatest totality, the shorter the duration of totality will be. Be prepared for a potentially brief but incredibly intense experience. At most it will be about three minutes. During that period the entire landscape will become dark – not quite night, but very dramatic none-the-less. You may also experience a distinct cooling during the eclipse as the warming rays of the sun are cut off. Also, if you are in a popular area during the event traffic may be heavy!

6. Final Thoughts

I travelled from Hamilton, Ontario to St. Louis, Missouri in 2017 to view the total solar eclipse with friends from the area. This was one of the most moving experiences I can remember. It was well worth the time and travel. And, I prepared for the photographic experience by reading and practicing with my equipment before I left for the trip. If you can take in the 2024 eclipse I highly recommend it.

My First Try at Photographing the International Space Station

The idea of being able to take a photograph of the International Space Station is enchanting. Here’s one of humanities’ greatest achievements, passing by very frequently and yet so far out of reach to those of us on the ground.

Taking photos of the ISS is perfectly possible from the ground, but it requires some preparation. First, you have to know how to find it. There are several smartphone apps and on-line sites that allow you to predict when and where the ISS will be visible from your location. I use ISS Spotter on an iPhone, which I find very handy.

Once you know where it is going to be you have to think about how to capture it. The ISS typically crosses a section of the sky at a rate of between 1 and 3 degrees per second. This doesn’t sound too fast, but when you realize that it’s about 100x faster than computerized telescope mounts move you get some idea of the challenge. Even a large consumer telescope on a computer mount just can’t keep up.

It IS possible to follow the ISS and other satellites using computerized telescope mounts, but they’re not off-the-shelf gear. An absolute master at this kind of photography is Thierry Legault, an engineer based in Paris, France. Thierry’s systems include modified mounts that can turn at the phenomenal speeds needed to track a satellite. Take a look at his images and his methods at: http://www.astrophoto.fr/

My equipment isn’t up to that sort of approach, but you don’t need to that way. Instead, I’ve tried mounting my 125mm Meade Terabeam Maksutov-Cassegrain telescope on a photographic tripod. This arrangement (see the photo) is easily carried in one hand. It depends on being able to use the finding device (in this case a Rigel Systems QuikFinder reflex sighting device) to follow the target. Using this simple set-up it’s possible to follow the target and take numerous photos or shoot video, and them examine the resulting images later for any that worked out. This is an approach related to “Lucky Imaging” that is commonly used in more sane corners of amateur astronomy.

ISS Hunting Rig

My ISS-hunting rig. I’ve mounted a Nikon dSLR camera at prime focus on a 125 mm Meade Terabeam Maksutov-Cassegrain telescope. This is then set up on a heavy-duty photography tripod. This telescope is equipped with a red-circle Rigel Systems QuikFinder (http://rigel.datacorner.com/rigelsys/quikfinder.html )

Of course I am using the term “sane” in a tongue-in-cheek manner here and mean no disrespect to those suffering from mental disabilities. It’s just the term that came to mind as I snapped away at the space station like a field gunner trying to shoot down an Sopwith Camel during the First World War.

There are a couple of very basic set-up steps that deserve every bit of attention before the pass begins.

First, ensure that your finding device is well-aligned with the telescope itself. You will not be looking through the telescope or camera to take these photos.  You’re flying blind, relying on the finder to set things up. You are adjusting the aim of the telescope throughout the entire pass. The steadier the better, but you still must keep moving to keep the ISS as close to the telescope’s centre of view as possible.

Second, focus is crucial. The ISS is tiny from earth – just a few arc-seconds across. Before the pass focus the telescope as carefully as possible on a star. This is a little easier said than done without having the telescope on a capable telescope mount. I used the moon and also very distant lights to try to focus the spot mac.

Jet 29 July 2017

While I was setting up to shoot the ISS I snapped this distant jet high over Lake Huron. Possibly 30 km or more away.


Keep in mind too that if you are using a dSLR your camera is going to shake like made when the mirror and shutter are activated. Every bit of extra motion is a problem. I think an ideal imager for this application would be a mirrorless camera with a full-frame sensor, but I’m not quipped with one of these.

For my first try I used a Nikon D800 camera on video mode. I started running the video before the ISS came into view, and simply kept the telescope pointed at it, moving as smoothly as I could, throughout the pass. Afterward I then exported all of the images using IrfanView, and threw out everything that wasn’t a recognizable image. In other words, nearly all of the resulting frames.

moon from the beach 29 July 2017

Just for the focus. I used the moon as a target to focus the telescope prior to the pass of the ISS on 29 July 2017 visible from the mouth of the Pine River. 

Despite all of the make-shift arrangements, at the end of the day I did capture something with structure. Here are a couple of frames:

ISS 29 Aug 2017 from Pine River

I’ve seen some authors recommending this approach with telescopes on Dobson mounts. This makes a lot of sense too, as these mounts are intended to allow you to point the telescope by hand with ease. I will try to take more images of the ISS as time and opportunity permits. It’s a fascinating subject!

Copyright 2017 David Galbraith


Get ready for AstroCATS 2014: Canada’s Astronomy Trade Show!

The Royal Astronomical Society of Canada – Hamilton Centre is presenting the second annual Canadian Astronomy Trade Show, AstroCATS, on 3-4 May, 2014!

The web site for this exciting event is: http://www.astrocats.ca/

The big show will open at 10 AM on Saturday 3 May, and close at 6. On Sunday it opens again at 10 and closes at 4. AstroCATS 2014 will be held in the David Braley Athletic & Recreation Centre at Mohawk College, 135 Fennell Ave. West, Hamilton L9C 1E9.

Visit the web site to find lists of vendors, special speakers, and all of the exciting highlights planned for the show in May. Hope to see you there!

Supernova SN 2014J in Ursa Minor

On 22 January 2014, S. J. Fossey discovered a supernova, designated SN 2014J, in the Cigar Galaxy, Messier 82. It’s turned out to be the brightest of its type visible in the Northern Hemisphere in living memory. M82 is in Ursa Major, nice and high in the night sky for those of is in the Great White North! It is not visible to the unaided eye, clocking in at about Magnitude 11.5, but that’s well within the capability of a home telescope on a dark night to spot, and especially with a short exposure with a digital camera on a 4″ or 5″ telescope.

I wanted to see if I could take an image of the supernova from my livingroom couch, and so used a simple web form to request an image be taken by the MicroObservatory Network in Arizona. Anyone can use this free educational system, using the on-line forms at: http://mo-www.harvard.edu/MicroObservatory/

The simple icon-driven menu asks for subject, field of view, and exposure time. All the rest is automated. I sent the request in on 25 January, and on the afternoon of the 26th I received an email message from the system indicating that an image was ready. Here’s the result. The supernova is the bright star to the right of centre of the irregular galaxy.

SN2014J in M82 20140126

Supernova SN 2014J is visible between the hair lines along the right side of this image. The cloudy mass is the Cigar Galaxy, Messire 82, in Ursa Major. This is an uncropped image as provided by the MicroObservatory Network. See the text for description. Click on the image to see it scales a little better.

The fact that the galaxy is so far over to the right side of the frame is the result of errors in the on-line system. It amounts to perhaps a 10th of a degree or less, but that’s enough to put things way off of centre. Given that this is a free, public-access system, you can’t complain too much! I wish I had had access to a system like this as a child – this and other robotic telescope systems now available to the public would make for amazing science fair projects! I have an article in a forthcoming issue of the Hamilton Amateur Astronomer’s newsletter The Event Horizon on robotic observatories, which I find a very nice way of avoiding the cold outside conditions of astronomy in Canada in the winter. Yes, I’m a wimp, but I’m a warm wimp.

Copyright © 2014 David Allan Galbraith

Public Access Astronomy: the MicroObservatory Robotic Telescope Network

The MicroObservatory Robotic Telescope Network, operated by the Harvard-Smithsonian Center for Astrophysics OWN “Observing With NASA” program allows free, public access use of 6″ reflecting telescopes located at the Whipple Observatory in Amado, Arizona. If you are a teacher interested in introducing astronomy in a hands-on way, a parent wanting to show kids that they can also take astrophotos, or just interested in experiencing with Internet-based remote observatories, making use of this free system is well worth a try. This system has been in use for over a decade and is a lot of fun.

The network can be reached at: http://mo-www.cfa.harvard.edu/MicroObservatory/

Guest users can select from a pre-set menu of target objects. In December 2013 I tried shooting images of several deep space targets over successive nights. The 6″ reflectors (identified as Ed, Ben and Cecilia, Donald) are programmed with a simple web form. Once images are captured, users are sent an email message with instructions on how to retrieve the files. The files are all returned as 650 x 500 FITS files. The network also supplies MicroObservatoryImage, a free program based on Java that processes FITS files, including stacking RGB images, optimised for the small images the system produces.

The web site is well worth exploring, as there are several resources there of interest to teachers, especially.

Here are three images I captured with this system in December 2013. The images I was able to capture did suffer from several artifacts, including diffraction spikes, and “blooms” produced by very bright stars.

The Cab Nebula (Messier 1) imaged with one of the educational telescopes of the  MicroObservatory Robotic Telescope Network.

The Cab Nebula (Messier 1) imaged with one of the educational telescopes of the
MicroObservatory Robotic Telescope Network. Three images were taken, one each through a red, green, and blue filter, and then they were combined with the MicroObseervatoryImage software supplied by the network.

NGC5457, Messier 101, imaged with the MicroObservatory Robotic Telescope Network.

NGC5457, Messier 101, imaged with the MicroObservatory Robotic Telescope Network. This was taken as a single 60 second exposure, taken at 5:37 AM local time on 31 December 2013. The area imaged is approximately one degree of arc across.

orion1 retouched1

The Great Nebula in Orion (M42) imaged in three colours using the MicroObservatory system. The colour image was assembled as described above for the image of the Crab Nebula. This image is slightly retouched to reduce artefacts created by both diffraction effects (spikes) and also “blooms” or smears produced by very bright stars.

Copyright © 2014 David Allan Galbraith

Free Solar Observing Today at Royal Botanical Gardens

We’re going to hold Royal Botanical Gardens’ third “Solar Thursday” today (29 August 2013) from 12 noon to 1 PM, on the lawn area in front of the main visitor entrance to RBG Centre. Everyone’s welcome to join us for a view of the sun through special, safe telescopes.

If you have a solar telescope you are very welcome to join us in presenting the amazing spectacle of the sun to the public. We like to be “open for business” at 12 noon, so coming a little earlier to set up would be helpful. We have electrical power available if your telescope needs it. We start packing things up around 1 PM. RBG is located at 680 Plains Road West, Burlington, Ontario.

We will be looking through specially-equipped telescopes that filter the bright light from the sun. These filters make it safe to observe the sun’s surface. Remember:

No one should ever look directly at the sun without special, appropriate equipment. Permanent eye damage or blindness may result from inappropriate attempts to see the Sun, or the use of incorrect equipment. We will be using telescopes designed specifically for solar observation, or those equipped with filters specifically made for this purpose.

Once you’re familiar with the equipment and have things in focus, you will be able to take in the sights in just a few minutes! Some nice sunspots are visible today.

Katie

Visitors to Royal Botanical Gardens, 680 Plains Road West, Burlington, Ontario enjoying views of the sun live during RBG’s second “Solar Thursday” event, 15 August 2013.

Copyright © 2013 David Allan Galbraith

Enchanted by the Sun

This summer I’ve been delving into solar studies. Perhaps it’s like the proverbial goldfish not noticing the water that surrounds him, but I really hadn’t paid much attention to our nearest star. Last year I did start to take my own look at the sun, using solar filters on an old 80mm f15 refractor, and that was pretty interesting. Somehow the solar bug has really bit me this year.

I’ve added some equipment to Pine River Observatory this year, and that’s helped. In addition to my Meade ETX 125 Terabeam telescope, which I now have equipped with both a Kendrick Astro Mylar solar filter and a Baader Planetarium continuum filter, I picked up a Coronado 60 mm Solar Max II BF15 Hydrogen alpha telescope a couple of months ago. The upshot of all of that is that I can take a look – and am starting to photograph – the sun at two quite different wavelengths, corresponding to different structures on its surface.

There’s an interesting feedback loop here. As I’ve been able to see the sun for myself, and consider how to take photos, and even explain what can be seen through a telescope to others taking a look, I’ve found that my curiosity has risen. I’ve been reading more, seeking out a deeper understanding of what I’m seeing. That in turn has made my observations a little better, I think, and certainly has meant I’m doing a better job of interpreting for others.

It’s also been exciting to see that there’s a lot happening in terms of science and solar observation right now. Consider these three news items from the past month alone:

  • A new ground-based solar telescope (the New Solar Telescope or NST) at the Big Bear Observatory in California has just started to produce incredible images of the photosphere and sunspots – with a resolving power that approaches 30 miles on the sun’s surface (http://www.bbso.njit.edu/)
  • A new solar observatory satellite, Interface Region Imaging Spectrograph (IRIS) achieved “first light” in July, and is already transmitting wonderful images back to earth (http://iris.lmsal.com/)
  • NASA has updated information available on the progress of the present solar maximum. This event, every 11 years or so, is marked by a peak in sunspot numbers, and represents a reversal in the orientation of the sun’s magnetic field. The present solar maximum was anticipated for 20111 but it’s a little late. The magnetic flip is anticipated between now and November.

These are just examples of the activity around solar observations in the past little while. The more I’ve read, too, the more I want to find out. The sun is quite addictive! More postings to come.

sun aug 2013

The sun’s “surface,” or photosphere, photographed from Burlington, Ontario’s LaSalle Park Marina on the morning of Monday 5 August 2013. This image was captured using a Meade ETX 125 TB telescope equipped with a Kendrick Astro Mylar solar filter and a Baader Planetarium continuum filter. These filters produce a green image that highlights contrast around sunspots and solar granulations. The image is a mosaic of two shots taken with a Nikon D5100 at prime focus, as the image produced by the telescope is larger than the D5100’s APS-C-sized sensor. The image was processed with Paint.net, a free image processing program. Although we might think of the sun as a big ball of hot gas it’s structure is much more remarkable than that. At its core the density is enormous – a liter of the gasses would weight 150 kg. At the surface we can see, as in this photo, the density is less than 1% of that of our own atmosphere at ground level.


Copyright © 2013 David Allan Galbraith


Solar Thursdays at Royal Botanical Gardens Start This Week!

Would you like to take a look at the sun, just for fun? Are you going to visit Royal Botanical Gardens (http://www.rbg.ca) on Thursdays this summer, or just in the neighborhood? Introducing “Solar Thursdays” – a weekly one-hour chance for visitors to  directly see features on our nearest star, the Sun, at RBG.
Solar Thursdays are a chance to see the sun through specially-equipped telescopes. We’ll be set up from 12 noon – 1 PM in July and into August, weather permitting. Some clouds will be OK, but heavy clouds will mean cancellation. We’ll be on the lawn in front of the main entrance to RBG Centre. There’s also a chance that other local astronomers might join in and bring along their own solar-equipped ‘scopes, too! Our address is 680 Plains Road West, Burlington, Ontario. Parking is free. We hope you’ll visit RBG after your look at the sun.
On Thursday we’ll likely see sunspots and solar prominences.  We’ll also have a solar weather update on hand. This offering is free of charge, and is being presented by RBG staff on their lunch hour.

scope

Visit us on the front lawn of Royal Botanical Gardens Centre, 680 Plains Road West, Burlington, Ontario, for Solar Thursdays! Here a visitor takes a turn looking at the sun with a Coronado 60 mm Solar Max II BF15 H-alpha telescope.

We will be looking through specially-equipped telescopes that filter the bright light from the sun. These filters make it safe to observe the sun’s surface. Remember:

No one should ever look directly at the sun without special, appropriate equipment. Permanent eye damage or blindness may result from inappropriate attempts to see the Sun, or the use of incorrect equipment. We will be using telescopes designed specifically for solar observation, or those equipped with filters specifically made for this purpose.

Once you’re familiar with the equipment and have things in focus, you will be able to take in the sights in just a few minutes.

sun

The sun photographed on 23 July 2013 from the front lawn of Royal Botanical Gardens, by using eyepiece projection and a Sony pocket camera. Several prominences are visible in this view through a Coronado 60 mm Solar Max II BF15 telescope.

We hope to see you there!

Copyright © 2013 David Allan Galbraith