Remote Astrophotography: Taking It On-Line

Since the time of Galileo four hundred years ago, astronomers have used telescopes to see the sky. Since 1839 people have tried to take photographs through telescopes. Now, anyone with an internet connection – and a credit card – can take their own photos through professional-grade telescopes.

It’s called remote astrophotography, and I’ve been getting interested in giving this a try. I haven’t done so yet myself, mostly because I don’t have a good home internet connection yet. This seems to be a good reason to get one, and I hope to report back later this winter with some results of my own. In the mean time, I thought I’d report here on this intriguing idea.

A variety of companies are now operating telescopes in places with good conditions for astronomy and offering them up on-line, with equipment and software that allows paying users to control them remotely. What’s more, these set-ups are designed for astrophotography. The telescopes are equipped with specialized CCD cameras designed for astrophotography. The lure of remote astrophotography is not just being able to use these telescopes to see on-line. They can take amazing photographs and deliver them to your home computer.

Costs for this service range from an annual subscription of around $150 at SLOOH Space Camera (http://www.slooh.com/slooh-home.php) to a fee per use running up to $100/hr at LightBuckets (http://www.lightbuckets.com/index.php), MyTelescope.com (http://www.mytelescope.com/index.html), or iTelescope (http://www.itelescope.net/). There are likely others out there, too.
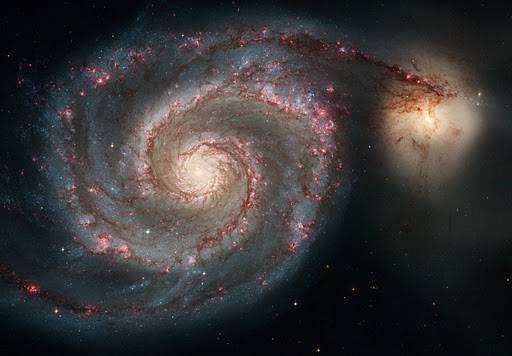
A NASA image of M51 and NGC5194.

A NASA image of M51 and NGC5194. M51, a magnificent spiral also called the Whirlpool Galaxy, is on the left. It is interacting with M51b or NGC5194, the dwarf galaxy on the right.  They are located south of Canis Major, in the constellation Canes Venatici. These galaxies are well within the scope of amateurs to image. An astrophotograph of these galaxies taken by amateur astronomer Martin Pugh won the 2012 Astronomy Photography of the Year Award. (See this link for the contest: http://www.universetoday.com/97469/the-universe-shines-for-astronomy-photographer-of-the-year-winners/)

In some cases, users have to download specialized software like CCDCommander (http://ccdcommander.com/) that gives users complete control from their desktops, and even allows pre-programming of the functions of the telescope.

There are several reasons why remote astrophotography is very attractive. One of the most important from an image quality perspective is that the telescopes involved can be set up in remote locations with excellent dark skies and clear weather, such as in Arizona or even Chile. Users don’t have to make a trek to those locations to take advantage of the conditions. Another big consideration is cost. The camera, telescope, mount, and observatory systems set up by these companies can easily be worth $15,000 to $20,000 each or more. Renting some time on these set-ups is a lot more attractive than having to buy hundreds of kilos of very pricey kit. Furthermore, the remote telescopes are set up and maintained by experts. Even if money was no object, there’s a very long technical learning curve to really be proficient with big ‘scopes – years in many cases. Renting sidesteps all of that and can give you excellent results in hours, not years.

Remote astrophotography is not limited to by-the-hour rentals, either. Some people who are able to purchase their own telescopes chose to have them installed at remote locations for the same reasons as these rentals are located there: better sky conditions than at home. Clearly an expensive proposition, these private observatories have the potential to allow for many hundreds of hours of observing and photography that would be impossible under any circumstances other than moving to a dark sky location. Some people are able to take up that option, too.
Hang Out in the Galaxy Zoo

Would you like to contribute to something bigger than yourself? Have a few minutes every now and then, and access to a computer and the internet? You likely do if you’re reading this. If so, you too can help with research that is changing our understanding of the whole cosmos.

Galaxy Zoo is a new form of citizen science. Founded in 2007, the idea was very simple. Wonderful new telescopes and surveys of the sky were generating more information – more photographs of deep space – than the scientists behind the observing programs could possible classify. It’s not enough to just take a photograph of something to discover something new. You have to be able to “reduce” the observations into data – into a form that can be used to describe the scene statistically, or better, to test specific hypotheses.

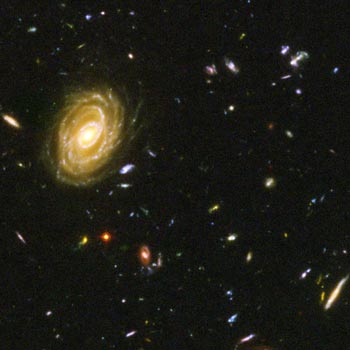
Hubble Space Telescope image of deep space

An image of very deep space taken by the Hubble Space Telescope. Everything in this image is a galaxy, from foreground to the most distant dot. Credit: NASA, ESA, S. Beckwith (STScI) and the HUDF Team. Source: http://hubblesite.org

Telescopes like the Hubble Space Telescope (http://hubblesite.org/), and observing programs like the Sloan Digital Sky Survey (http://www.sdss.org/) have imaged millions upon millions of very distant galaxies in certain areas of the sky. Some of these are billions of light years away. the challenge is that computers – so good at crunching information – are not yet very good at that “data reduction” step. In other words, you and I can look at a photo and tell right away if we’re looking at a photo of an elliptical galaxy (a little fuzzy blob of a thing), a spiral galaxy (a little fuzzy blob with distinct spiral structure), or something unusual (something that doesn’t fit the basic patterns).

So, in 2007 researchers reached out to the Internet – an early “cloud sourcing” exercise – for help. Now in its fourth iteration, Galaxy Zoo (http://www.galaxyzoo.org) lets users like you and me help with the mountain of galaxy images. In just a few minutes of preparation, you’ll be shown a photo of a galaxy and asked about its basic shape. A few other simple questions about what you see follows. All of your responses are taken by Galaxy Zoo by a simple “click on an icon” format. It’s a lot of fun, it’s real science, and some of the little galaxies you classify may never have been seen by anyone else (on Earth, that is). You can come back over and over, classifying more galaxies over time. You can also take on-line quizzes to test your knowledge about the universe.

As of 2012, the science team behind Galaxy Zoo have produced 25 scientific papers on the results of this effort. You can read all about the program, and also find links to the published results, at the Galaxy Zoo web site: http://www.galaxyzoo.org

Jump in! What are you waiting for?


“Night-Time Photography” at RBG: An Unabashed Plug

This post is a plug for a new public program at Royal Botanical Gardens that I will be presenting in February and March. The goal of the program is to introduce participants to photographing the night sky with camera and tripod, although we will talk a little about telescopes, too.

There are many wonderful things to photograph at night. You can take a look at some of my examples here at the Pine River Observatory blog, on my page entitled “Astrophotography Gallery.” We’ll consider both celestial objects – like the moon and stars – and also landscapes at night.

The stars make arcs in the sky in long exposures. This image was composed from about 120 individual wide angle photos taken with a Nikon D7000 on a tripod.

The stars make arcs in the sky in long exposures. This image was take along the shores of Lake Huron in August, 2012. It was composed from about 120 individual wide angle photos taken with a Nikon D7000 on a tripod, using free software called StarStaX.

On the first night, in the classroom at RBG Centre in Burlington, we’ll take a look at examples of night-time photography, and go through the basics of photography at night, including the kinds of scenes likely to be encountered and the equipment that might be used. There will be a light (pardon the pun) orientation to objects in the night sky, discussions about where and when photos may be most effective, and what limits photography at night. We’ll also talk about handling photographic equipment in cold weather.

The second night will be a practical  night out shooting the sky. The date for the second night is variable and will be shifted as needed, primarily to accommodate the weather. Keep your fingers crossed for some clear nights at the beginning of March!

The third night will be “show and tell” for the participants, and examples of working with software to prepare final images. It will likely be in later March, but might also be shifted, with the permission of everyone, to accommodate fitting in appropriate outside time.

There are still a few places. You can reach the RBG’s on-line ticketing program at: http://tickets.rbg.ca/PEO/all_events.asp

To find “Night-Time Photography,” select the link entitled “For The Nature Lover” at the lower left side of the page.

This program is being offered for a fee that goes to support Royal Botanical Gardens’ important charitable objectives. I’m not getting paid for this program. Just so you know.

Royal Botanical Gardens presents "Nighttime Photography" in 2013

Royal Botanical Gardens presents “Night-Time Photography” in February and March 2013

Lunokhod 2: The Little Tub That Could

Forty years ago today, on 8 January 1973, the Soviet Union launched the second of two audacious robotic missions to the moon.

While we have been celebrating the current and recent American Mars rover missions – and justly so – the mission of Lunokhod 2 still holds important places in the record books. The Soviet space program was ambitious, and even after the American Apollo program had landed astronauts on the moon and returned them to earth, the Soviet space planners were working on their own long-term goal of exploration and possibly building a lunar base.

The Soviet program made it to an amazing step, with the landing of two rovers on the moon, named Lunokhod 1 and Lunokhod 2. It was on 8 January 1973 that the lander named Luna 21 was launched toward the moon, landing there on 15 January. The complex, bathtub-shaped rover rolled out of the lander on the 16th, and after a checkout period, embarked on a six month exploration of the moon’s surface.

Approximate locations of the two Lunokhod rover missions.

Approximate locations of the two Lunokhod rover missions. Luna 17/Lunokhod 1 landed on the western edge of Mare Imbrium in 1970. Luna 21/Lunokhod 2 landed on the eastern edge of Mare Serenitatis in 1973, about 120 km north of the landing site of Apollo 17.

Lunokhod 1 had also been a success, three years earlier. It had functioned well for ten months, and eventually covered 10 km. Lunokhod 2 travelled further, but ran into trouble, literally, in June of 1973 when it apparently brushed against the wall of a crater. This impact may have knocked debris into vital parts, and over a few days, Lunokhod 2 stopped working.

The Soviet space program’s efforts to reach the moon came to a halt in the 1970s, with tragic failures of the very large launch vehicles that would have been their counterparts to the American Saturn V.

Although it’s been forty years since Lunokhod 2’s mission, that wasn’t the end of the line for Russian lunar rovers. Russia and India are now planning a joint mission in the coming years to put a new, solar-powered rover on the moon’s surface. The  Chandrayaan-2 mission may be launched in 2016, and will feature a lander built in India and a rover built in Russia. Unlike the Lunokhod rovers, which weighed over 1,700 kg each and were powered in part by radioisotopes (for heat; electricity was provided during the lunar day by solar panels), the proposed new rover will be much smaller – perhaps 100 kg – and solar powered).

Sources

NASA has posted photos taken from lunar orbit of the Luna landers and their Lunokhad rovers:

Updates on the timing of the joint Russian-Indian lunar rover mission:

Where To Go From Here?

While I’ve been interested in astronomy for over forty years, it’s only in the past year and a bit that I’ve returned to that interest in any sort of “serious” way as an amateur. I’ve been poking around at various telescope shops, getting to know some other amateurs in my area, and taking a lot of nightscape photos. I’ve even started taking a few photos of the moon and Jupiter with the equipment I have. Now what?

The sky is a big place. A simple calculation gives you an idea of just HOW big it is – and I’m not talking about how deep it is in time/distance. Consider first the moon. The moon is pretty big. It has a surface area about the same size as the continent of Africa, although we only can see about half of it from Earth of course. With the existing small telescopes I have I can make out features perhaps 5 km across if the lighting is right. The surface of the moon is about 38,000,000 km^2 (km^2 means “kilometer-squared or square kilometers) so if I can see half of it (in total) that’s about 19,000,000 km^2. A crater 5 km across has a surface area of about 19.6 km^s – so that little crater is just about 1/100,000 of the visible face of the moon. The whole visible surface is a lot of territory (or lunatory) to consider. Of course, it might be better to consider the visible disk of the moon, not the near hemisphere for a comparison like this. A disk with the radius of the moon would have a surface area of about 9,500,000 km^2, so the ratio would be about 50,000 craters-worth of area to explore. Still a lot! A purist would try this with angles but the answer would be the same as the disk area sketch.

The thing is, the moon is actually SMALL compared to the visible celestial sphere. Our eyes are drawn to the moon at night, but the reality is that it’s only about a half a degree across. The whole celestial sphere, encompassing 360°, has an area of approximately 41,253 °^2 (according to a Wikipedia entry on the angular area of the celestial sphere). The moon’s disk as an angle is about 0.2 °^2 – so it would take 206,000 moons to fill up the visible area of the sky! (The sun as virtually the same angular diameter as the moon – that’s why we can have such stunning total solar eclipses – so the same thing holds. The sun, so dominant in our sky, covers only about 1/200,000 of the visible celestial sphere. From the surface of the earth only about half of the celestial sphere is visible as the sky, and the sun is about 1/100,000 of it).

The moon photographed from Hamilton, Ontario, on 2012 12 19 2125 EDT with an 80mm refractor and Nikon D5100 at prime focus.

The moon photographed from Hamilton, Ontario, on 2012 12 19 2125 EDT with an 80mm refractor and Nikon D5100 at prime focus. Relatively simple equipment can take nice photos – but if you are interested in going further, what’s the next step?

The sky, then, has room for 200,000 moon-faces, and my little telescopes can show me details 1/100,000 of the moon’s surface. It’s overwhelming – and full of rich detail. From massive galaxies to wispy nebulas and sparkling star clusters, space beyond our little solar system is one of the richest treasures in nature. How luck we are that we can actually see it! If our solar system was within a more complex part of space we might not have as good a view as we do. Then again, it’s a fair bet that the more “interesting” places in space are far more risky too. Our fair wee planet has had less than five billion years of life so far, and only a few major boo-boos (like the asteroid impact that killed the dinosaurs – Ooops!).

So, back to the point of this ramble. As a (re)budding amateur astronomer, where do I start? I’m faced with this question because I’m looking seriously at upgrading some of my equipment, and different telescopes do different things. Do I make use of my existing optics and improve my ability to point and shoot, with a better mount and camera? Do I invest in a better optical tube (the actual “telescope” part)?

To some degree a telescope is a telescope. There are some basic characteristics everyone needs to consider when they are thinking about this kind of thing. One of the most important is portability. Like a lot of people, I live in a small apartment; I don’t have a garage or basement for storing large pieces of kit, and I don’t have my own space for a shed or observatory. So, compact and rugged is good. I’m also watching my budget (gulp). And, of paramount importance to me, I want to embark on something of a path in learning astronomy, not just grabbing at big telescopes because they’re cool! (and they are cool, and I’m a telescope geek).

I’m thinking I’ll start in the neighborhood this year, seeing what I can see – and photographing what I can photograph close to home in the “planetary” range – the sun, moon, and planets. This narrows things a bit, and is also a good choice for an urban dweller. Despite light pollution in cities, our own solar system is still quite observable from our sidewalks and parks because the objects are so bright. The existing ‘scopes I have – an old 80 mm refractor and a 130 mm “starter” Newtonian reflector – will do for now. What I need to do is to consider in the short term is what’s under the telescope and what’s attached to it.

Telescope mounts are important and perhaps underappreciated parts of the whole “system.” A heavy, capable mount makes viewing anything much easier. A lightweight mount only has the advantage of light weight. Small mounts shake. If you adjust a small telescope on a light mount it can take five or ten seconds or more for the resulting vibration in the camera to dampen out. So, I’ll be paying attention to mounts.

Cameras are at the other end of the process. There are some things I can do with my dSLR cameras, but the best images today are actually being taken with cameras that are much simpler than a dSLR but are designed to be used with a telescope – and a computer. Derived essentially from webcams, most cameras that work brilliantly for planetary photography by amateurs have small-seeming sensors – often less than a megapixel. They are also specialized in two other ways. They often have a built-in cooler, to help control internal camera noise – and they are often monochrome. Yes, black and white. You can do a lot in black and white, and you can get colour images by taking a series of monochrome images through coloured filters. The image files (often actually captured as short video segments in AVI format) are then processed with some ingenious computer software to create stunning, sharp images. So, I’ll also be looking at a small, specialized camera designed for planetary imaging. By starting with a camera and a sturdier mount, I can get going and will consider upgrading the optics a little later.

I’m also sure that there will be lots of opportunities to peek out past our solar system in the coming year. I’m going to be making visits to observatories, star parties, and other events to soak in more of deep space – and of course to be able to make reports here at Pine River Observatory! And I’ll be spending time under the night sky doing wide-field photography and just wandering around the stallar back-yard with binoculars and a good star guide. There are many lifetimes of space out there to enjoy.

© 2012, David Allan Galbraith

Jupiter and the Galilean Moons from a Sidewalk

Jupiter and the Galilean Moons, 7:28 PM EDT, 2 January 2013as seen from 40 McKay Road, Dundas, Ontario, CanadaLeft to right: HD27742 (star), Ganymede,Europa, Io, Jupiter, HD27639 (star), Callisto. Best image of moons and of Jupiter combined.

Jupiter and the Galilean Moons photographed 7:28 PM EDT, 2 January 2013 from a sidewalk in Dundas, Ontario. Left to right: Ganymede, Europa, Io, Jupiter, HD27639 (a reddish star), and Callisto. This is a montage of the best frame of the moons and the best frame of Jupiter, shot at different exposures because of the great difference in brightness between the two. Details follow below.

In my post on 1 January I described “first light” through an old 80mm f/15 refractor telescope: the first pictures I thought were fairly good after repairs, which happened to be of the photosphere of the sun. Although the nights this winter have been disappointingly cloudy in southern Ontario so far, on the evening of 2 January 2013 we had a cold, occasionally clear night. Between some of the clouds I was able to set up the 80 mm again and get some nice views of Jupiter and the Galilean moons, and also take some photos. This time I went out to the sidewalk in front of my place, with two of the legs of my tripod in the snow.

The results were very encouraging given the circumstances. Two major cloud bands on Jupiter were clearly visible, as were the four Galilean moons. With my Nikon D5100 body shooting at ISO 1250 at prime focus, I exposed for the moons at 1/8th of a second, and for Jupiter at 1/125th, taking multiple frames of each.

After getting inside and warming up, and following a little adjustment for contrast, brightness and sharpness, I was able to over-lay the best image of Jupiter onto its overexposed self on the best image of the moons. The result is the montage above.

There are much more sophisticated ways of taking images of Jupiter, the moon, and the other planets these days, even with a simple telescope such as I used. It was nice to see at least a recognizable image of the disk of Jupiter with the approach I used for this one. The D5100 is a nice dSLR for this kind of application because the LCD screen on the back swivels around. It was possible to get a pretty good view of the Jovian system using live view on the camera.

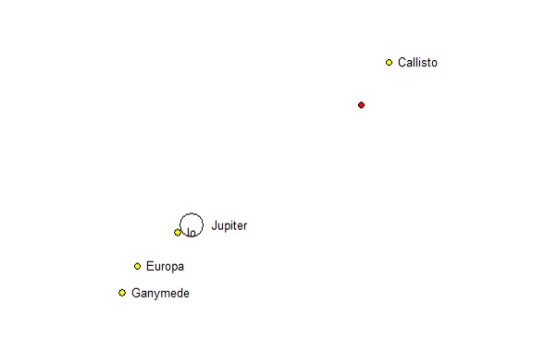
Chart of Jupiter and the Galilean Moons

The expected arrangement of Jupiter and the four Galilean Moons at 6:30 PM EST 2 January 2013 as portrayed by the free planetarium software Cartes du Ciel.

I had confirmed the positions of the moons, and also the small reddish star HD27639, with the free planetarium software Cartes du Ciel, before heading out, and so had a pretty good idea of what to expect in terms of positions. What made the experience really nice tonight was that I was joined on the sidewalk by some of my neighbours, who were very excited by a peek at old Jove. They enjoyed looking both with an eyepiece on the ‘scope and also on the camera live view screen.

Sharing these experiences, even as simple as this one was, is very rewarding. Many local astronomy clubs offer “sidewalk astronomy” experiences, too.  If you have a telescope and know how to find a few things in the sky, get out and share it with your neighbours, friends and family. If you don’t have a telescope and would like to find out more, seek out local clubs and see what they have to offer.

As a memento I made a print of the photo for my neighbours… they don’t have a computer, so email wasn’t an option. That’s OK – when Galileo was looking at the same scene four hundred years ago this month, he didn’t have email either.

© 2012, David Allan Galbraith

First Light Through an Old Bargain

When a telescope is first put to use it’s traditional to call the first observations made through it, or the first images taken with it, as “first light.” It’s perhaps a bit of a cheat to consider photos of the photosphere of the sun that I took on 1 January 2013 as “first light” through one of my telescopes, but as I’ve been making repairs on it since I picked it up in December I felt a certain sense of occasion on New Years Day when I was able to set it up “for real” for the first time.

Set-up for balcony solar photographs.

Set-up for balcony solar photographs. My balcony faces WSW – good for some afternoon sungazing.

I have an affection for old optical equipment. As evidence I can readily point to my Hasselblad and large format film cameras, still used on occasion. For some months I had noticed an older refracting telescope – complete with a mount and wooden tripod in a big wooden box – on the floor of a local telescope shop. In early December it was on sale for $100, and suddenly found a new home at Pine River Observatory. Well, in my living room. Same thing, really.

So, I started fiddling about with the old telescope a few weeks ago, and quickly discovered why it was such a bargain. In addition to several bends where bends shouldn’t be in the fine adjustment gears on the mount, and a couple of other minor issues, the biggest problem with the telescope was that the collar that holds the eyepiece or other fittings in the focuser was in fact pretty badly damaged. It had been knocked around (I suspect it had been actually pulled or knocked out of the telescope by force at one point) and was being held into the telescope with aluminum duct tape! With a bit of perseverance, cleaning out, and re-bending, the collar is now looking much better, is equipped with new thumb screws, and is firmly epoxied into place – permanently.

The specifics are that it’s an 80 mm achromatic refractor, f/15 (or, put another way, it has a focal length of 1200 mm), and it’s labelled with the brand name “Polaroscope.” So far I haven’t been able to find out too much about this brand. It was likely made in Japan, possibly by a company called Eikow or Towa, and similar ‘scopes may have been sold under various trademarks. It may be as old as 1960.

Even though the repairs have been made, it’s still January in Ontario, and this winter so far has been very cloudy. However, on New Years Day there was a great deal of very welcome sun, and I was able to set up the old telescope in a fairly heavy-duty mount for a little solar imaging (Shortly after getting the telescope I did play around a little with taking photos of the moon with it, but this was with the camera held to the tube with duct tape). Equipped with a mylar solar filter over the objective and a Nikon D5100 dSLR at prime focus, I was pretty pleased with the $100 bargain ‘scope.

The results were worth waiting for, as several large sunspots came into view this afternoon. I have several more subjects planned for this telescope, including Jupiter and the Galilean moons, when the weather will be accommodating at the right time.

The sun's photosphere photographed 1t 1400 EDT, 1 January 2013 from Hamilton, Ontario.

The sun’s photosphere photographed at 1400 EDT, 1 January 2013 from Hamilton, Ontario.

Note:

As I’m now back to work five days a week, following a very nice holiday for Christmas and the New Year celebrations, I don’t think it will be very realistic for me to be posting daily blog entries. In January I am hoping to average one or two postings a week. Just so everyone knows.

Happy New Year! But Why January 1st?

Have you ever wondered why January 1st is the first day of the New Year?

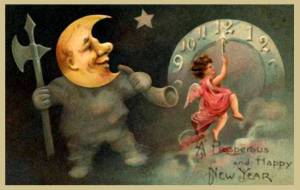
Vintage New Years Card

Vintage Happy New Years Card Celebrates the Turn of the Year

Our present everyday calendar is pretty much taken for granted, and it works fairly well. It has 365 days in it (more or less), given the adjustment of an extra day every four years (more or less). Most people know that the two equinoxes and the two solstices (natural events) fall more or less within a day or so of the same date each year, so it must have some synchronization with celestial events.

Many people may also be aware that the present calendar used by most of the world (and there are still some others in use, by the way), is called the Gregorian Calendar, and they may even know that it’s named after Pope Gregory XIII. As readers of the Pine River Observatory blog, I hope you might already have that information! But did you know that the Gregorian calendar was created by one of the most respected astronomers and mathematicians of his day, and that one of the largest craters on the moon is named in his honour?

I’m getting ahead of myself. First, we have to consider the matter of calendars themselves, what they do, and then we can see how January became the beginning of the year we now mark.

Calendars are tools that allow people to keep track of time and plan when things are going to take place. Calendars started, and are still, astronomical tools. Although we are used to having one calendar in the west today, there are three different cyclical celestial events that are all involved: the cycle of the earth’s revolution around its polar axis (defining one day), the cycle of the moon’s orbit around the earth (defining one lunar month) and the cycle of the earth’s orbit around the sun (defining one year). Making up a calendar would be easy if these things were strongly related to each other – but they aren’t.

The earliest antecedents of today’s calendar can be traced to Italy roughly 3,000 years ago, with a calendar consisting of ten months of around 30 days each, which began each year in March. About 700 BC January and February were added to the calendar, making the Roman Calendar. About three hundred years later, January was designated as the first month of the year – and thus we have the first of January being considered as the beginning of the year – around 450 BC. Further adjustments were made up to 46 BC, but the passing of the seasons – and the “annual” cycle of the sun – still didn’t align with the calendar. Julius Caesar instigated a further refinement by the astronomer Sosigenes of Alexandria that brought things closer together. This calendar, the Julian Calendar, was aligned only to the solar year. Any attempt to synchronize the annual calendar with lunar cycles was abandoned.

For something close to 1,600 years the Julian Calendar was used by the western world. However, by then errors had accumulated to the point where the calendar date of the equinoxes had crept forward by 13 days, seriously throwing off things like the Christian celebration of Easter. Pope Gregory XIII put into motion the reformation of the calendar in 1582. A Jesuit astronomer and mathematician from Germany, Christopher Clavius (1538–1612), was the person responsible for working out the details of the new calendar. It worked much better than the Julian Calendar in matching up with the solar year’s accounting of days, and it’s the calendar we still use. However, it was not universally adopted; it was another 200 years before it was taken up in England and he United States, for example. And, there are other calendars still in use in various societies around the world, and for various purposes.

So, the convention of starting the year on the first of January has remained in place in the descendants of the Roman Calendar – including our own. Like many things, the convention of having the year start on the first of January is just that – a convention. It is the result of a long history of changes that led to a calendar that works pretty well, but it’s also a compromise.

Both Sosigenes of Alexandria and Christopher Clavius are memorialized in the names of craters on the moon.

Crater Clavius is in the southern highlands of the moon. At 230 km across (and with 18 associated smaller craters) Clavius is one of the largest craters on the moon; remembering for whom it was named is a link to the story of the calendar most of us use today, 430 years after his re-alignment of the days of the year. Crater Sosigenes (17 km across) is located along the western edge of Mare Tranquillitatis (as are three satellite craters, Sosigenes A, B and C), to the east of a larger crater named for Julius Caesar (90 km, with 10 smaller associated craters). Rimae Sosigenes, a lunar rille, stretches to the east of the crater. Apollo 11’s lunar module landed about 280 km south east of this area.

Sources

Information on the history of calendars: Kaler, J. B. 1996. The Ever-Changing Sky: A Guide to the Celestial Sphere. Cambridge University Press. Cambridge, UK. Pg 174-175.

Lunar feature names: International Astronomical Union (IAU)  Working Group for Planetary System Nomenclature (WGPSN). Gazetteer of Planetary Nomenclature. Available on line at: http://planetarynames.wr.usgs.gov/

Public domain vintage Happy New Years Card: http://webclipart.about.com/od/New_Year_Clip_Art/ss/Vintage-Happy-New-Year-Moon.htm